
When I told my brother what I would be making for his teacher he was
ok with all my ideas, but then I let my creativity kick in and I started
thinking outside the box and this is what I came up with:


Pretty awesome, eh? I thought so too! I played around with this idea in my head while I was thinking of what to make for my brother's band director. In retrospect I went about everything backwards. I started designing by measuring out the size that I wanted the wall hanging to be. Then for a short while I forgot that music isn't like a sentence so you can't just keep it going on one single line (I felt silly for not remembering that after taking about 7 year of both voice and music classes). Aargh...that meant I had to cut my 74 inch long felt into two pieces and make two wall hangings.
Now I have two pieces of felt, both 12 inches in height and 37 inches in length and I have to scale my sheet music to make templates of everything. "Why?" you ask...mostly because I'm lazy and I can't draw to save my life..but hey, if you can draw...then by all means draw out your templates.

Before I get ahead of myself, perhaps I should make a list of the things you will need to make this craft.
Supplies:
1. White Felt (2 pieces 37 inches in length and 12 inches in height)
2. Black Felt (half a yard should be plenty)
3. Pins
4. Felt Glue
5. 3/8 inch Black Grosgrain Ribbon (2 spools)
6. Sharp Scissors
7. Measuring Tape
8. Sewing Machine and Black Thread
9. Firm Fusible Interfacing (same size as the white felt)
10. Iron and Ironing Board
11. Tailor's Chalk
12. Scotch Tape or Packing Tape
13. 1/8 inch Black Ribbon (can be polyester like satin)
14. Rotary Cutter and Self-Healing Mat (not necessary but recommended)
15. 2 Wooden Dowels - 1/2" inch diameter and 3' feet long (optional)
16. Black or White Paint (Optional - Only needed if using wooden dowels)
Instructions:
If you know nothing about music, here's a guide to reference all the music terms.
1. Spot clean any dirt marks on your white felt pieces. After, line up your firm fusible interfacing on the back of each of your white felt pieces and iron the interfacing per the product directions. Once you have ironed your interfacing backing, allow the felt to lay flat while the interfacing cools. Go over it again if the interfacing is lifting or making a bubble. Although the interfacing will not be visible you want to make sure it adheres to the felt so that it will provide a supportive backing.
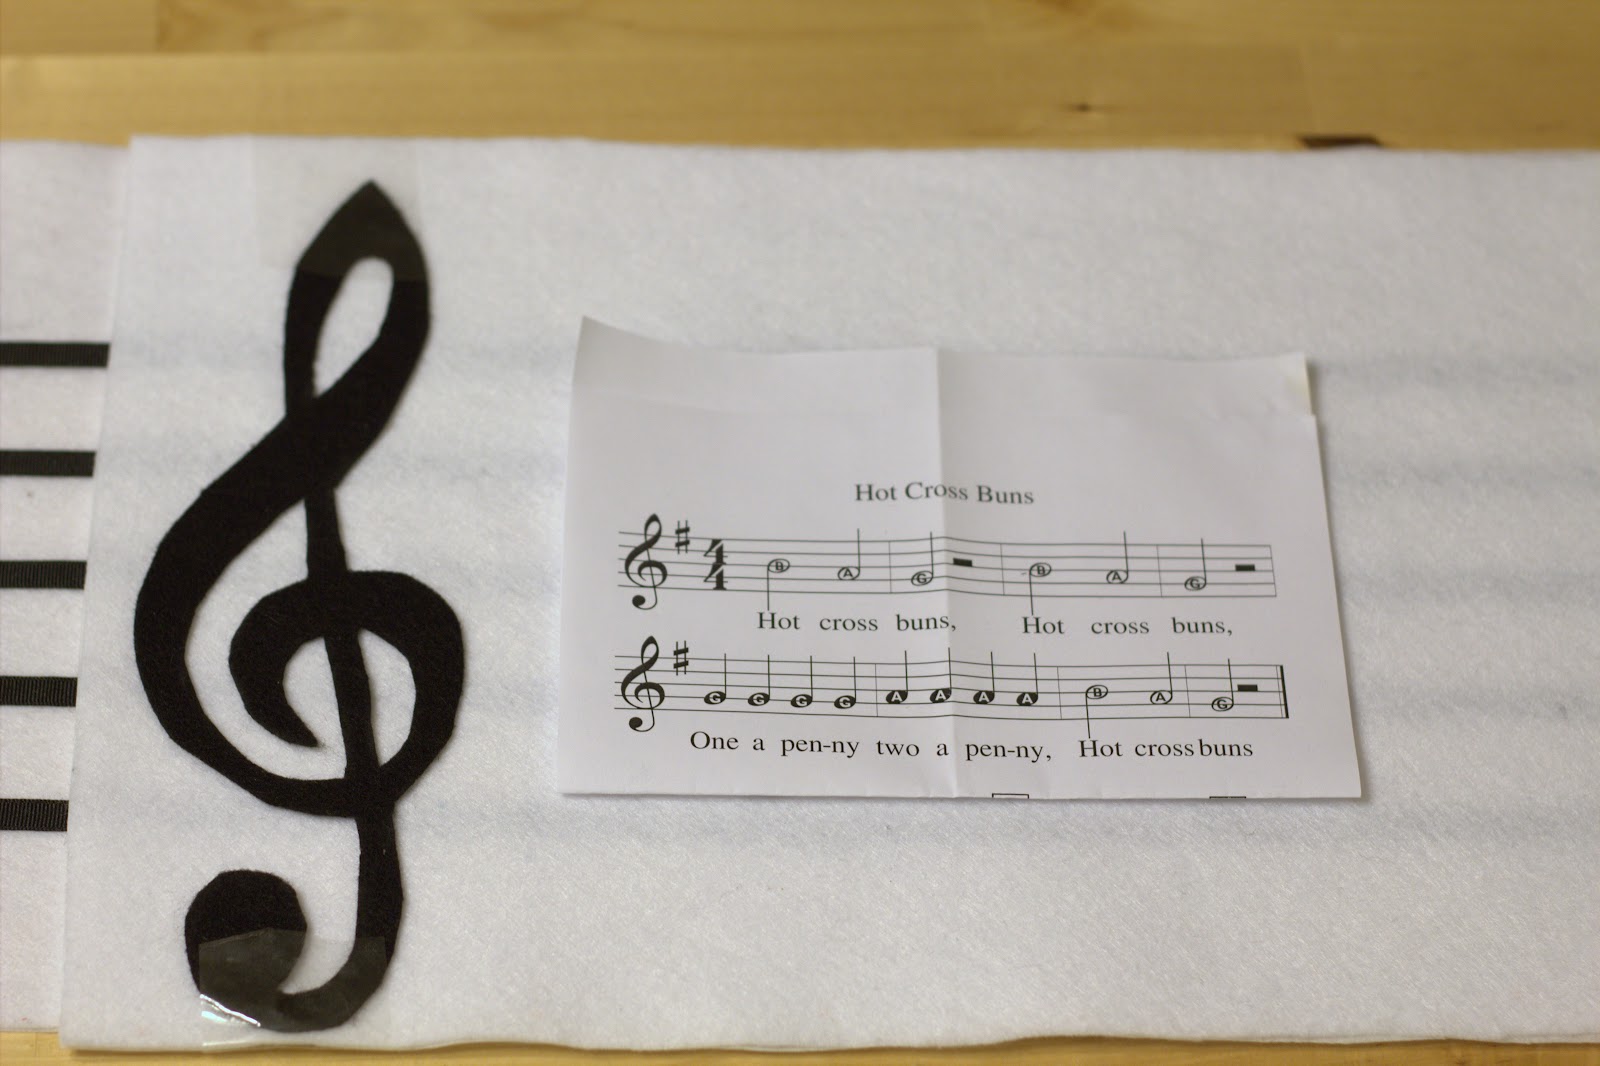
2. Using your tailor's chalk trace around your treble clef template and cut out two treble clefs. I pinned the template to the felt and cut them out at the same time. Feel free to trim a little here and there to make them look identical.
3. Take your treble clef and line it up where you think it should be on the white felt pieces. Using your tape, gently tape it down to the felt but do not press down on the tape. We are using the tape to hold the clef in place while we measure out and glue the music lines. Repeat this process on the second sheet of white felt.


4. Sheet music has 5 lines and 4 spaces, so we will need to cut out 10 pieces of 3/8" wide ribbon (plus one extra for the end of the music). Don't forget to leave about 1-1.5 inches extra for folding over and sewing down. I only sewed the beginning of the ribbon since the ends will be covered up by the ribbon bar. With the thread ends I made knots to ensure the stitches will not come undone.

5. Start laying your lines on the white felt, making sure your music note template can fit in the spaces of the lines. Also, you want to make sure that the lines touch certain parts of the treble clef. I had to trim off some of the clef in order for the lines to be visible.

6. After you have laid out all the lines and everything is evenly spaced, you can start gluing down the beginning of each line but DO NOT glue down the treble clef yet. I left the clef taped in place and gently applied glue to the back of my ribbon without moving the treble clef's position too much. Allow the glue to dry so you will have an anchor and guide for gluing down the rest of the ribbon.

7. Once the ends have dried, start gluing down the rest of the ribbon and use your tape measure to make sure the spacing stays even. Try not to pull the ribbon as you glue. After all the glue is applied, firmly pressed the ribbon with your finger...don't slide your finger down the ribbon, just press it down as you move along. You don't have to worry about the glue showing, because it *should* dry clear however you don't want too much excess. It's ok to leave the ends unfinished and hanging off the edge of the felt, we will clean them up at the end of the project.

8. Yeah it's starting to look like real music! When all the lines have dried, remove the tape and glue your treble clef. Allow your treble clef to dry.
9. As your treble clef dries, you can start cutting out the music notes. I used the music for an alto saxophone so my notes may be different than yours. If you need to make a half note, fold the note in half and cut out the center OR use white felt to make a circle for the inside to give the illusion of a hole. I went about it the hard way and cut out the inside part (face palm).

10. After you've cut out all your notes, cut out the numbers...in my case I needed two 4s. Next cut out strips to make the sharp sign (looks like a pound sign). I made my strips 1/4 inch wide and about 4 inches in length and I trimmed them down to fit (My little brother did this part...poor kid can't craft to save his life...but that's about to change!). And last, cut out any rests (my music called for half note rests, yes they do look like little top hats).
11. Arrange all the pieces now so that you have the numbers in place, the sharp sign in place and the notes/rests in place. Take your 1/8 inch wide ribbon and cut the strips to make the bars. With everything in place, begin gluing all the pieces down. I didn't sew the ends of the 1/8 inch wide ribbon because it's too narrow, instead I used sharp scissors to cut the ends and I glued the ribbon to the felt. I smeared a small dab of glue on the ends to help prevent any future fraying.
12. At the end you can glue the lines of the staff down (or sew them like I did because I wanted to finish quickly) and not worry about them being folded over and sewn since they will be covered up by the ribbon marking the end of the measure.
13. Since this project is made of felt you can tack it to the wall as is OR you can make it fancy and add a hanging bar. To add the hanging bar cut six pieces of ribbon to make hanging loops. You can select the color and size of your ribbon...I used the black 3/8" ribbon I already had. Cut your ribbon pieces 5" long and sew the ends together. After the ends are sewn turn the loops and press the ends so that when you sew them to the felt the ends will be hidden and they will not fray. You can use any type of stitch here. I used white thread and sewed the loops using a zig zag stitch and went back and forth a few times.

14. This isn't exactly the last step, it can be done while you're waiting for stuff to finish drying. If you have a sheet of 100-400 grit sandpaper I recommend lightly sanding the dowels so the spray paint will adhere better...if you don't have sandpaper, don't worry you can spray paint without it.
That's it, you're done! Now you just need to hang up your bad boys you just made. If you have any questions about the tutorial, feel free to leave a comment or send me an email (listed on my contact page).


Pretty awesome, eh? I thought so too! I played around with this idea in my head while I was thinking of what to make for my brother's band director. In retrospect I went about everything backwards. I started designing by measuring out the size that I wanted the wall hanging to be. Then for a short while I forgot that music isn't like a sentence so you can't just keep it going on one single line (I felt silly for not remembering that after taking about 7 year of both voice and music classes). Aargh...that meant I had to cut my 74 inch long felt into two pieces and make two wall hangings.
Now I have two pieces of felt, both 12 inches in height and 37 inches in length and I have to scale my sheet music to make templates of everything. "Why?" you ask...mostly because I'm lazy and I can't draw to save my life..but hey, if you can draw...then by all means draw out your templates.
Before I get ahead of myself, perhaps I should make a list of the things you will need to make this craft.
Supplies:
1. White Felt (2 pieces 37 inches in length and 12 inches in height)
2. Black Felt (half a yard should be plenty)
3. Pins
4. Felt Glue
5. 3/8 inch Black Grosgrain Ribbon (2 spools)
6. Sharp Scissors
7. Measuring Tape
8. Sewing Machine and Black Thread
9. Firm Fusible Interfacing (same size as the white felt)
10. Iron and Ironing Board
11. Tailor's Chalk
12. Scotch Tape or Packing Tape
13. 1/8 inch Black Ribbon (can be polyester like satin)
14. Rotary Cutter and Self-Healing Mat (not necessary but recommended)
15. 2 Wooden Dowels - 1/2" inch diameter and 3' feet long (optional)
16. Black or White Paint (Optional - Only needed if using wooden dowels)
Instructions:
If you know nothing about music, here's a guide to reference all the music terms.
1. Spot clean any dirt marks on your white felt pieces. After, line up your firm fusible interfacing on the back of each of your white felt pieces and iron the interfacing per the product directions. Once you have ironed your interfacing backing, allow the felt to lay flat while the interfacing cools. Go over it again if the interfacing is lifting or making a bubble. Although the interfacing will not be visible you want to make sure it adheres to the felt so that it will provide a supportive backing.
2. Using your tailor's chalk trace around your treble clef template and cut out two treble clefs. I pinned the template to the felt and cut them out at the same time. Feel free to trim a little here and there to make them look identical.
3. Take your treble clef and line it up where you think it should be on the white felt pieces. Using your tape, gently tape it down to the felt but do not press down on the tape. We are using the tape to hold the clef in place while we measure out and glue the music lines. Repeat this process on the second sheet of white felt.


4. Sheet music has 5 lines and 4 spaces, so we will need to cut out 10 pieces of 3/8" wide ribbon (plus one extra for the end of the music). Don't forget to leave about 1-1.5 inches extra for folding over and sewing down. I only sewed the beginning of the ribbon since the ends will be covered up by the ribbon bar. With the thread ends I made knots to ensure the stitches will not come undone.

5. Start laying your lines on the white felt, making sure your music note template can fit in the spaces of the lines. Also, you want to make sure that the lines touch certain parts of the treble clef. I had to trim off some of the clef in order for the lines to be visible.

6. After you have laid out all the lines and everything is evenly spaced, you can start gluing down the beginning of each line but DO NOT glue down the treble clef yet. I left the clef taped in place and gently applied glue to the back of my ribbon without moving the treble clef's position too much. Allow the glue to dry so you will have an anchor and guide for gluing down the rest of the ribbon.

7. Once the ends have dried, start gluing down the rest of the ribbon and use your tape measure to make sure the spacing stays even. Try not to pull the ribbon as you glue. After all the glue is applied, firmly pressed the ribbon with your finger...don't slide your finger down the ribbon, just press it down as you move along. You don't have to worry about the glue showing, because it *should* dry clear however you don't want too much excess. It's ok to leave the ends unfinished and hanging off the edge of the felt, we will clean them up at the end of the project.

8. Yeah it's starting to look like real music! When all the lines have dried, remove the tape and glue your treble clef. Allow your treble clef to dry.
9. As your treble clef dries, you can start cutting out the music notes. I used the music for an alto saxophone so my notes may be different than yours. If you need to make a half note, fold the note in half and cut out the center OR use white felt to make a circle for the inside to give the illusion of a hole. I went about it the hard way and cut out the inside part (face palm).

10. After you've cut out all your notes, cut out the numbers...in my case I needed two 4s. Next cut out strips to make the sharp sign (looks like a pound sign). I made my strips 1/4 inch wide and about 4 inches in length and I trimmed them down to fit (My little brother did this part...poor kid can't craft to save his life...but that's about to change!). And last, cut out any rests (my music called for half note rests, yes they do look like little top hats).
11. Arrange all the pieces now so that you have the numbers in place, the sharp sign in place and the notes/rests in place. Take your 1/8 inch wide ribbon and cut the strips to make the bars. With everything in place, begin gluing all the pieces down. I didn't sew the ends of the 1/8 inch wide ribbon because it's too narrow, instead I used sharp scissors to cut the ends and I glued the ribbon to the felt. I smeared a small dab of glue on the ends to help prevent any future fraying.
12. At the end you can glue the lines of the staff down (or sew them like I did because I wanted to finish quickly) and not worry about them being folded over and sewn since they will be covered up by the ribbon marking the end of the measure.
13. Since this project is made of felt you can tack it to the wall as is OR you can make it fancy and add a hanging bar. To add the hanging bar cut six pieces of ribbon to make hanging loops. You can select the color and size of your ribbon...I used the black 3/8" ribbon I already had. Cut your ribbon pieces 5" long and sew the ends together. After the ends are sewn turn the loops and press the ends so that when you sew them to the felt the ends will be hidden and they will not fray. You can use any type of stitch here. I used white thread and sewed the loops using a zig zag stitch and went back and forth a few times.

14. This isn't exactly the last step, it can be done while you're waiting for stuff to finish drying. If you have a sheet of 100-400 grit sandpaper I recommend lightly sanding the dowels so the spray paint will adhere better...if you don't have sandpaper, don't worry you can spray paint without it.
That's it, you're done! Now you just need to hang up your bad boys you just made. If you have any questions about the tutorial, feel free to leave a comment or send me an email (listed on my contact page).
1 comment:
What a great idea! Love it for a musical family.
Post a Comment