Translate

Showing posts with label simple DIY tutorial. Show all posts

Tuesday, October 1, 2013

Easy Upcycled Toddler Belt Tutorial


This summer some of my son's shorts were too big at the waist so my husband made a make-shift belt by tying a grosgrain ribbon around Nik's belt loops.  It didn't look pretty but it did the job and helped keep up his pants!  (I'm a big fan of recycling and I repurpose things when I can, for example, I usually save ribbon and string from packaging of products we buy...and that is where the grosgrain ribbon came from.)


After seeing the make-shift belt I decided to make a proper belt by sewing two D rings onto the ribbon.  I took one end of the ribbon and folded it over the D rings and tucked the end under a 1/2" inch.


Stitch close to the fold of the ribbon and tie the thread ends.  Cut off the extra thread after you have made your knots.  If the end of the belt is unfinished, you might want to dab on a little fray check or fold the end over and sew it. 


Quick and easy, right?  This would be a perfect last minute gift for any little girl or guy, plus you get to reuse ribbon and keep it out of the landfill...win-win!

Wednesday, October 24, 2012

Double Sided (Reversible) Pocket Square Tutorial


Thanks to my sewing hobby I've become popular...naturally this new found popularity comes with requests to make things.  One such request was from a high school friend that wanted pocket squares to wear to church.  He sent me this tutorial and asked me if I could make something like it.  Although this isn't rocket science, it looked extremely time consuming...and this project probably would have drove me nuts trying to get all the stitches perfect (I can be a bit of a perfectionist).  Thus I decided to try to convince my friend to try it himself since it only required a needle and thread...his response was that he didn't have time to do it himself.  In my head I laughed and said to myself, "Neither do I,"  however what I actually said was that I could give it a try on my sewing machine.

I had never sewn a pocket square before, so I had to do a little research before attempting this project.  Most of the pocket squares I found were hand sewn and made out of silk, but I did find a few that were non-silk and machine sewn (like these J. CrewExpress, and Hill-Side Pocket Squares), which convinced me it is okay to sew using cotton fabric and a machine.

Our friend gave me 3 different fabrics and thought about how I could make a cool pocket square out of the material.  Two of the fabric coordinated, so I thought it would be cool to make a double sided pocket square and add a little flair so the plain color side wasn't so plain.


Here's how I made the double sided pocket square:  

Supplies:
  1. 2 Different fabrics of your choice (I'm using cotton fabric)
  2. Thread
  3. Cutting mat with ruler
  4. Rotary cutter (or scissor)
  5. Iron
  6. Sewing Machine

Instructions:

1. Line up your fabric (on your cutting mat) so you will be cutting on the grain.  Cut out a 13' x 13' square from each of your fabrics, so you will have two squares.


2.  Pin your fabrics right sides together


3. Once you have your fabrics pinned you can sew around the square with a 1/2" seam allowance, leaving a 1"-1 1/2" opening on one of the sides (so you can turn it right side out).  Be sure to use the back stitch function around the opening area.


Use the back stitch function
4.  Clip your corners so they will turn nicely.


4.  Turn the pocket square right side out and use something to help you get those corners nice and sharp (I usually use a chopstick).

5.  Iron the square once it is right side out and pay special attention to the opening area.

6.  After you have the pocket square nice and ironed, go to your machine and top stitch around the edge of the pocket square.  For the one I made, I used a decorative stitch with metallic gold thread to make it interesting and give it a nice pop!


There you go, you're done!!!

(p.s. - this would make a perfect last minute gift for the holidays...wink, wink)

Tuesday, August 28, 2012

Boho Mending - Tutorial


My tween-age cousin ripped her jeans during P.E. so I told my grandma to bring them to me so I could fix them up.  I had the pants in my sewing room for a few weeks before I finally settled on an idea as to how I would fix them to make them look pretty/ trendy.

I decided on a pretty easy and straight forward fix, but I did have to do a little ripping and tearing in addition to my sewing...yup, that's right, I destroyed the jeans a little more to achieve this look.  Also, this sewing can be done by hand...I only used my machine for the sake of saving time.   

 Supplies:

1. Sewing machine with denim needle or large hand sewing needle for denims
2. Thread to match the denim color
3. Measuring tape
4. Scissors
5. Lace of your choice (I used 100% cotton crochet lace)

Instructions:

1. Measure the size of your rip and cut your lace to be an inch longer than your measurement.


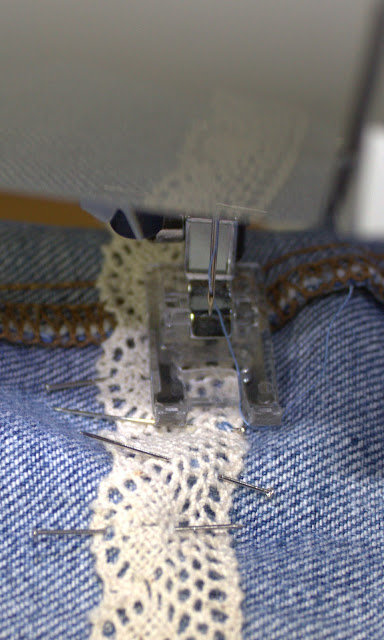
2. On the right side of the jeans, brush the frayed material to it's proper position so it doesn't look like there is a rip.  Fold over the ends of the lace and pin it in place on the wrong side of the jeans.


3. Carefully placing the jeans under your machine...this takes a little wiggling and funky positioning to get it situated under the needle (and so you don't sew through both sides).  One your jeans are in place, sew a zig zag stitch along the top (starting at either end) and pivoting at the corner and sewing down that side, then continuing around the entire piece of lace.


4. Once you have stitched the lace, turn the jeans right side out and inspect the ripped area.  I trimmed a little here and there on the ripped section to expose the lace "patch".  I wanted it to look like it was peaking through and in some spots I had to cut away part of the jean material and fray it.  I achieved the fray look by removing the a few threads from the jean fabric weave.


5.  You're done!  Pretty easy, huh?  The most difficult part is getting the jeans in the right spot under your machine!  Trust me, it took years of being lazy to perfect that technique ;)  Ha ha ha....just kidding!


Thursday, July 5, 2012

Simple DIY Elbow Patches

This past winter I wrote a guest post for Clothed Much.  It was a simple tutorial written for people who love fashion but who may not have everything a sewer might...so there's a little improvising in the tutorial to make it easy for everyone.  I realize it's not very season appropriate at the moment however I thought it would be nice to share here.

Here's the tutorial: 

Do you have a hole in your sweater or are you just obsessed with elbow patches like I am?  In either case, adding elbow patches to a sweater or cardigan is super easy and it can even be done without a sewing machine.  Yup, you read right, no sewing machine needed and nope you don't need fabric glue or a glue gun.   However it will require a little hand sewing, which shouldn't be too bad because I know you all have a mending kit or minimergency kit, right?  (Note: I'll try to be as detailed as possible in my instructions for those of you who don't do much sewing)

Asos at ShopStyle

undefined

To create your own elbow patches here is the list of supplies you will need:

Supplies

1.  Hand sewing needle
2.  Felt in the color of your choice (one rectangle from the craft store should be enough) - you can find felt at Walmart, JoAnn Fabric and Craft Stores or Michaels
3.  Thread (to match or contrast the color of the felt)
4.  Tailor's Chalk or a non-permanent fabric marker (you can also use regular chalk or a regular washable marker instead)
5.  Sharp scissors
6.  Tall square tissue box
7.  Pins or safety pins

Are you excited to make some elbow patches?  I am, let's get started!
    Instructions:

    1.  Put your sweater/cardigan on and using a mirror and your chalk/marker make an "X" on your elbow area.


    Yes, I missed my elbow in this pic, but you get the idea...

    2.  Next take your scissors and cut off the top of the tissue box.  Remove any plastic that may be around the opening of the box top.


    3.  Grab your felt rectangle and fold it in half (hamburger style) and pin it so that the fabric stays folded in half.  Using your tissue box top as a template, trace an oval on the felt. 


    4.  Pin your ovals over the "X" marks you made.  Fold the sweater/cardigan in half to check and see if the oval are placed evenly in the same spot of each arm.


    5.  Begin hand sewing your patches and try to keep the fabric level and even as you sew.  For this project I recommend using an overcast stitch.  You can find great hand sewing instructions here.


    6.  After the patches are sewn down you are done!  If you can't get enough of elbow patches you can also try making them in different shapes like I did in my previous tutorial here.