Translate

Showing posts with label sewing for kids. Show all posts

Tuesday, September 16, 2014

Star Wars Kids

I have a confession...I am secretly a huge Star Wars fan!  I know it's shocking news, but it's true.  Phew, now we can continue on with the post.  

In August I helped plan a bridal shower and I suggested a Star Wars theme.  Much to my delight, the soon-to-be bride and groom liked the idea!

I had a lot of fun looking for Star Wars print fabric.  I wasn't sure what patterns to use for the children's clothes, so after going back and forth with myself, I decided that a plain design would work the best for each outfit.


For Nik, I made a pair of simple shorts (pattern here) with the Star Wars fabric he picked out himself.  I love going fabric shopping with him because he is beginning to understand the whole sewing process and he loves looking at the fabric with me.  He now says, "Mommy sewing"...it's so cute to hear those words.


For Violet's outfit, I used the Piper dress pattern.  I seriously love this pattern.  It's an easy sew and it's very versatile.  I was too lazy to make my own bias tape so I just used plain bias tape from the store.

I had some trouble sewing the bias tape over the collar because it was bulky and it didn't lay smooth.  The problem wasn't horrible enough for me to sew it again.  Perhaps with a good pressing the bias tape will lay flatter.


I love both of these outfits, the fabric is so geeky and fun.  I foresee more like them in the future!!

Tuesday, February 18, 2014

Simplicity 2292 Pattern Review

Front View
This pattern has quite a few great fall/winter clothes options however I only sewed the pants for my son.  I cut them out in a size 4T and they sat on my sewing table for months, so I'm glad I finally finished them.  It drives me nuts when I look at my sewing table and I see a half finished project or a stack of fabric that I was supposed to make something with...enough of my ranting.  When I made these  pants I left out the D ring on the side, because putting that on my toddler's pants would be a disaster.  I could imagine him attempting to tie anything he can find to that little D ring, so I left it off.
Back View
The instructions are pretty straight forward except for the part about sewing the fly.  I really think pattern companies need to be more descriptive about their patterns.  I wasn't sure if I was sewing a faux fly or a real fly.  There aren't instructions for a button or a zipper and I didn't really feel like leaving a gaping part in the fly area so I just sewed the fly shut and made it a faux fly.  I topstitched the pants with regular thread but you can't tell so I will probably go back and topstitch it with a thicker thread.  Another thing, I wish patterns gave tips on how to sew with particular fabrics.  I own a walking foot and I used it to sew the corduroy, however if I was a novice sewer and tried to sew using a regular sewing foot I would have had a difficult time.
Patch Pocket
Cargo Pocket
I think the pants came out darling and I think my son will love them once he grows into them.  I'm tempted to try sewing the jacket included in this pattern, it's pretty cute and I can make one for each of my littles.  

Thursday, January 30, 2014

Gretchen Cardigan - Pattern Review

*I am a Craftsy affiliate and this post does contain an affiliate link, however all opinions are my own.*


*Sorry this is an old post that I meant to publish in November...eeek!  I am so behind.*

The moment I saw this pattern I knew I had to buy it because it was too cute to resist.  I do admit that I was a little hesitant at first because I like quick projects and this pattern looked like it might take a while to sew, however I am pleased to report that the Gretchen cardigan came together quicker than I expected.

The instructions are very easy to follow and you can sew this cardigan without a serger....or if you have one, you can definitely use it.  I made this cardigan using jersey interlock from my stash and I made the cuffs out of matching rib knit (both fabrics were from JoAnn's).

Before I use my serger on knits, I baste my seams with my regular sewing machine.  I use a walking foot and I sew with the longest stitch length my machine has on it to make my basting stitch.  I learned this technique in the craftsy class I keep talking about (Sewing with Knits).  I tried to sew the ruffles using a zig zag stitch however I had some problems sewing zig zag with the walking foot.  I seriously don't know what I'm doing wrong...I tried playing with the stitch width and length and the machine didn't change the stitch.  I decided it was best not to ruin my work and to just use my coverstitch machine and call it a day.

When making this cardigan, I didn't follow every instruction in this pattern.  I decided not to make this a button up cardigan and I used rib knit for the binding.  I almost didn't have enough rib knit to make the binding so I kinda winged it and it worked!  I think the cardigan compliments the dress I made for little HB.  Next time I make use pattern I might try mixing prints like in the pattern pictures.  :)  

Tuesday, November 19, 2013

Every Little Thing Dress - Pattern Review


I enjoy making gifts for people, it's my way of showing that I care and it gives me an excuse to be creative.  I've made a few things for HB over the years (here, here and here) and it gives me joy to see her wear my creations (and know that someone else likes my work!).  This year I didn't know what I was going to make for her so I looked over some patterns I've had sitting in my stash and I decided to use the Every Little Thing Top/Dress pattern by Shwin Designs (I actually had this pattern pinned before I knew I was having a little girl so I knew I had to buy it when I found out baby #2 was going to be a girl).


The pattern is a great staple and it's very versatile so it's an excellent choice for your pattern stash.  The one thing I did not like about the pattern is that the instructions assume that you have sewing experience and that you know about things like pressing your seams and adding interfacing to the buttonhole area.  I know that adding interfacing depends on the type of fabric you use, however a novice sewer might not have this knowledge and it could cause problems for them.  For my dress I didn't need interfacing because the fabric I used was a bottom-weight fabric.  


I followed most of the directions when making this dress, except I topstitched the bow and I left a seam on the bottom band and just serged the ends instead of making it more like a binding.  By serging the band on the dress, there wasn't much of a need for me to add the topstitching above the band.  I also left out the pockets on my version.


I definitely plan on making more dresses and tops using this pattern, it's a quick sew and I love the endless possibilities.

I also made a cardigan to go with the dress, but I'll talk about the cardigan in another post!


Tuesday, October 22, 2013

KCWC Day 2

#kcw #day1 #varsitycowl #nik #sewing #distractions


KCW day 1 was a great success!  I managed to cut out the fabric for the Varsity Cowl and I also taped and cut two of the patterns.  Tonight I plan to start sewing the Varsity Cowl Pullover and I am hoping to finish it all in my hour of sewing time.

During day 1 I noticed that if I didn't take breaks from my sewing (like I always do), I was able to get a lot accomplished.  I think I need to get in the habit of giving myself an certain amount of sewing time and try to stay focused during that period of time.  I felt like a more efficient sewer when I am in "the zone" and it felt great to make progress on my sewing queue.   

Tuesday, October 1, 2013

Easy Upcycled Toddler Belt Tutorial


This summer some of my son's shorts were too big at the waist so my husband made a make-shift belt by tying a grosgrain ribbon around Nik's belt loops.  It didn't look pretty but it did the job and helped keep up his pants!  (I'm a big fan of recycling and I repurpose things when I can, for example, I usually save ribbon and string from packaging of products we buy...and that is where the grosgrain ribbon came from.)


After seeing the make-shift belt I decided to make a proper belt by sewing two D rings onto the ribbon.  I took one end of the ribbon and folded it over the D rings and tucked the end under a 1/2" inch.


Stitch close to the fold of the ribbon and tie the thread ends.  Cut off the extra thread after you have made your knots.  If the end of the belt is unfinished, you might want to dab on a little fray check or fold the end over and sew it. 


Quick and easy, right?  This would be a perfect last minute gift for any little girl or guy, plus you get to reuse ribbon and keep it out of the landfill...win-win!

Monday, April 29, 2013

KCW Spring 2013 Day 6 and Day 7

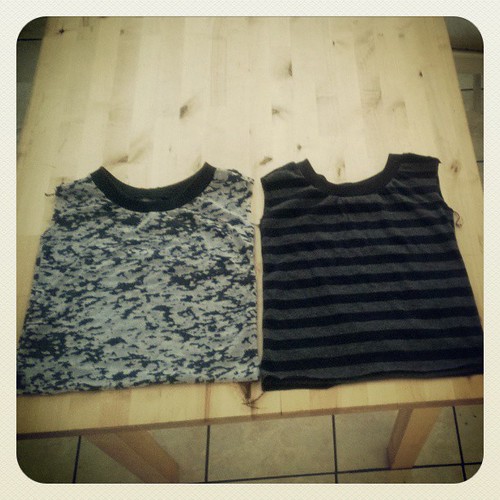
On Saturday I ran a few errands and I think I overexerted myself, by the time we came home and I had zero drive to sew.  I did change the thread in my coverstitch machine and buy/wash the black rib knit that I needed, but that was all I accomplished on Saturday.

I had lost all will to do anything on Sunday.  I cut the neck band and attached it to the 2 tanks but I didn't sew the hem or the sleeves yet.  I will probably have to go back and stitch down the excess part of the neck band...I wasn't too happy with the outcome, it looks gathered a little in some parts (especially on the striped tank)...not cool on a boys tank!  Maybe tonight I can make a little progress on the tanks.

p.s. I'm in the home stretch!  My last trimester!!! Woohoo!

#kcwspring2013 #kidsclothesweek #sewing #distractions

Monday, April 22, 2013

Project of the Moment - Simple Spring Toddler Skirt

I was thinking of a "Thank you" gift for someone and while I was brainstorming I came up with the idea of a cute little skirt with heart shaped pockets.  I know this design isn't ground breaking but I thought it was super cute, so I had to share my creation.


I used yellow and white seersucker for the skirt and red and white seersucker for the pockets.  I made the pockets double sided and sewed them on the skirt and left enough room at the top for little hands.  In retrospect I think these pockets might be too small but I was afraid of making them bigger and overwhelming the skirt.

I hope my friend's daughter enjoys the skirt!


I am also nesting up a storm!  This blanket was a quick sew with my new binding foot.  

Wednesday, December 5, 2012

Toddler Fur Vest - Simplicity 3582


Back in September I saw this cute toddler fur vest at Babies R Us and of course my first thoughts were 1) too bad I don't have a little girl to dress in this, 2) I can totally make that myself (for less than the store price) and 3) I want one in my size.  I never really gave fur vests a second thought until recently...I mean is it just me or do they seem to be all the rage this season/year?

With a birthday party around the corner I thought I could use it as my opportunity to make a fur vest as a present.  I found a few free patterns online and I thought they were all adorable, however I wanted my neck to be cut higher, more like this Simplicity pattern.  Little did I know, the pattern didn't go up to the size I needed, doh!

I thought about making my own pattern but instead I got out my new tracing paper and ruler and traced over the simplicity pattern and added a 1/2" in all the right places.  I followed the pattern instructions and decided that the fur vest needed a ribbon belt to cinch in the waist a little (it will also probably help keep the vest on since this is the age where toddlers love taking clothes off instead of putting them on).


This has to be one of the easiest patterns I have ever used!  It was so clear and straight forward that I was able to sew up the vest in no time (or at least it seemed that way).  The most challenging part about this project was dealing with the slippery lining and the thick fur.


If you plan on making a fur vest on your own, here are a few suggestions:

1. Use a pre-shrunk cotton for the lining (the regular lining works fine but mine snags easily and that's not good for children)
2.  Sew with a walking foot, it will feed through the machine smoothly
3.  Look for fur with a low pile (meaning height), my fur was pretty thick and it was a pain to cut!


p.s. My fur is supposed to be dry clean only, but I threw it in the machine on the hand wash cycle and used the air dry setting on the dryer.  It did take a long time for it to air dry but it came out fluffy and good as new (without a sour smell).

This is the entire outfit I made (the skirt was made from my own pattern). 

Thursday, September 13, 2012

Project of the Moment - RIT Your Heart Out

I had my little brother help out with a few of the gifts we made for his band director and I was very impressed by his quick learning.  I mean, I knew the kid was smart but I didn't expect him to pick up on crafting so fast!  For one of the projects we dyed 5 little onesies to match the color of the fabric I used for the other gifts and decorated them.  I will admit we did make his band director a lot of gifts, but it's hard to stop crafting when you're having fun.

While I cooked dinner my brother dyed the onesies and he got the color pretty darn close.  See for yourself:


When I first thought of the onesies I wanted to make felt appliques but then I stumbled upon the perfect iron-on appliques at JoAnn's.


Of course I had to make a onesie with a tie applique!  I wanted to make one for Nik so I figured now would be the perfect time to try making one.

The bib was the final project I made for my sewing for kids class.  It was very easy to make and I was able to sew it all in one sitting.  I added iron-on fleece in the middle to make it more absorbent.  I originally wanted to make the fabric waterproof but when I read the packaging it advised, as a precaution, against using it on things that may be "...chewed or sucked on by children."


After I made the bib I still had a good amount of fabric left over so I made a tie applique onesie and matching mitts, however I'm afraid the mitts might be too large for the newborn.


Tuesday, July 31, 2012

Sewing for Kids Round Up

I have sad news, I lost everything on my computer.  It really sucks when I start thinking about everything that I lost...all my pictures and documents.  I had pictures of all my projects on my computer so I could look back and keep record of the things I made but I lost those images.  At least some of my pictures are still here on the blog.

Even though you've probably seen these pictures over the last few months, I thought it'd be nice to do a re-cap so you can see all the cool things I made in my Sewing for Kids class.

Here is my first project, the double skirt.  I made skirts for little girls before but I really like the style of the double skirt with complimentary fabric.  Oh so chic!


The apron skirt variation is a cute little number but I thought the corner sewing was frustrating because my corners would line up nice and even.  In the end I got everything to line up but it took me a few tries.


Baby pants!  I was a little nervous to sew these, even though I've made pants for myself before.  I think it was the elastic back and faux fly that I found to be intimidating.  In reality these pants are super quick and easy to make and I plan to make more for Nik.


Ah, the collared shirt...yeah...I didn't quite finish it.  I don't think I'll use this pattern again.  Deborah's pattern is very cute but I think a short sleeve version would be best for Nik.  I found a McCall pattern that I'd like to try (it's a little different).  Perhaps this time I'll use "wearable muslin" so I won't have the fraying problems I did with the muslin in the picture.


Another double layer skirt, this time with bolder prints!


The pinafore is probably the cutest little thing ever, but it did have a fair amount of steps to the construction and the hem was a pain.  I guess I really need to see how the hem should be done in person.  My hem didn't look bad from the outside but I felt like it didn't look correct on the inside (but who's going to see that?).


The overmost was my favorite thing to sew!  I love the style (and the fact that it can be reversible)!  In fact, I used to own 5 pairs back in 7th grade.  Yes, at times I would wear a different pair each day.  By the time I started high school I had outgrown them all (that was probably for the best..however I did own a pair of short overalls).  My husband also loved these little overalls because they reminded him of the ones he used to wear when we were in high school.  I guess that makes us on big redneck overall wearing family!


The reversible jacket was not my favorite thing to sew because of the zipper.  I think I had to redo it 3 times...ugh!  I hope that the next time around it will be easier for me and that Nik likes this jacket when he gets a little bigger.


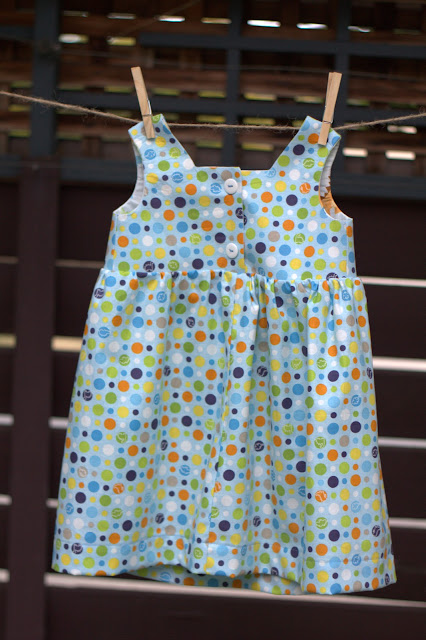
This dress was quick and easy to sew and I even used buttons!  If I ever have a little girl, she will be wearing tons of these dresses.  The pattern is simple but the re-mix possibilities are endless.


I may have said this a few times before, but I think the class was worth the money.  This class boosted my sewing confidence and I learned a lot about complex garment assembly (not to mention the patterns were included so I can use them over and over again).  I wouldn't call myself a beginner sewer, a rusty sewer would be a little more appropriate.  Deborah's class is perfect for sewers of all levels and it's tons of fun sewing along with someone else.  If you're interested in signing up for the next class, you can find more information on Whipstitch's website.     

Tuesday, July 24, 2012

Project of the Moment - Chicks Dig Dinosaurs

Fin!  Ok, even though I didn't sew all of the projects from my sewing for kids class (I don't plan on sewing the bonnet and I need to try making a shirt again), I finally feel the weight off my shoulders. This project is the last project I was worried about completing before my access to the class website expired.  

Dress Front
Dinosaurs!
Back opening with buttons!!
Dress Back
For the inside lining I put more dinosaur fabric...you can't really tell but the print isn't one direction.
I added my tag so I could write the size, I really need to get size labels.
Isn't it cute?  I must have sewn this in record time, in fact it all came together so fast that my husband was amazed.  I cut out the pieces on a Tuesday night while making dinner.  On Wednesday night I cut out the interfacing and attached it to the bodice, put the baby to sleep and finished sewing the bodice, attaching the skirt and making the button holes!  Then, on Thursday night I sewed on the buttons (by hand, I guess I didn't get a button foot with my machine, oops!) and made the hem.  Needless to say, my fear of making button holes has been conquered.  I no longer have to put a pattern back in the bin if it calls for buttonholes.

For this project I was inspired by the fabric and I thought it would be perfect for a special little lady I know who loves dinosaurs.  The colors and the pattern of this fabric collection by Little Yellow Bicycle is great for both boys and girls.  I just wish I would have had something like this when I was little...I would have loved it!  Once upon a time I loved dinosaurs sooo much that I memorized facts about each and every single one.  This was my favorite book (it may be a tad outdated now):


I was introduced to dinosaurs by my Uncle Edward and I remember him beaming with pride when he would tell the story of how his 5 year old niece informed her teacher that there is no such thing as a brontosaurus. Of course my teacher didn't believe my story of how the brontosaurus had the wrong head and it was actually an Apatosaurus.  Oh how I digress...anyway, I'm very happy with the outcome of this dress and I can't wait to see little HB wear it.