Translate

Showing posts with label sewing for boys. Show all posts

Tuesday, September 16, 2014

Star Wars Kids

I have a confession...I am secretly a huge Star Wars fan!  I know it's shocking news, but it's true.  Phew, now we can continue on with the post.  

In August I helped plan a bridal shower and I suggested a Star Wars theme.  Much to my delight, the soon-to-be bride and groom liked the idea!

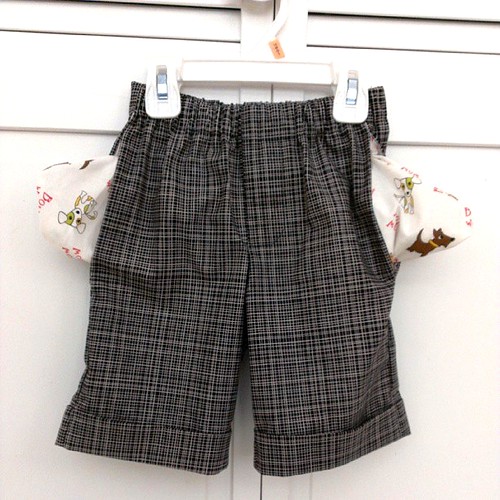
I had a lot of fun looking for Star Wars print fabric.  I wasn't sure what patterns to use for the children's clothes, so after going back and forth with myself, I decided that a plain design would work the best for each outfit.


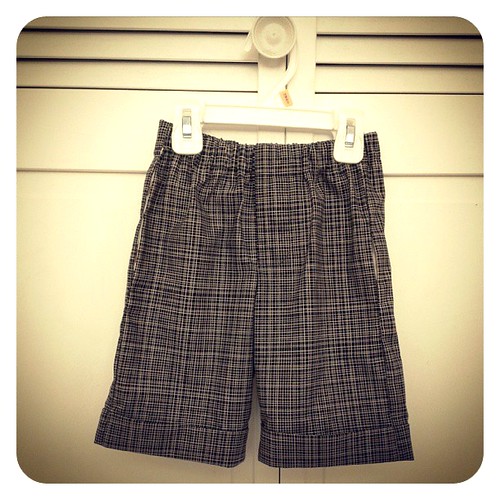
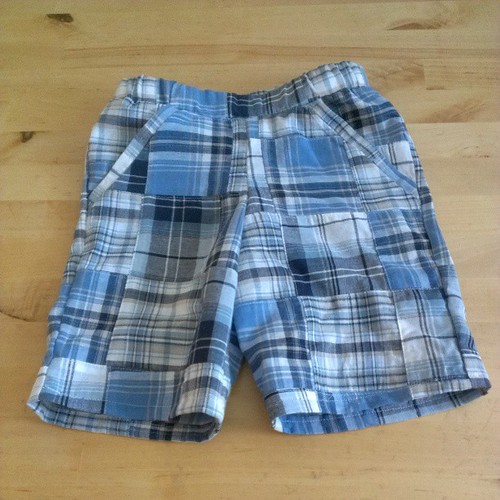
For Nik, I made a pair of simple shorts (pattern here) with the Star Wars fabric he picked out himself.  I love going fabric shopping with him because he is beginning to understand the whole sewing process and he loves looking at the fabric with me.  He now says, "Mommy sewing"...it's so cute to hear those words.


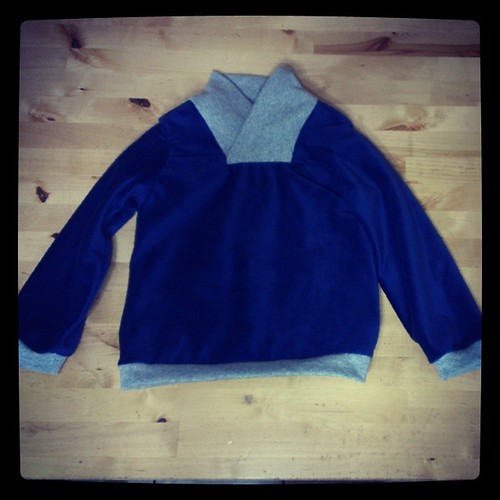
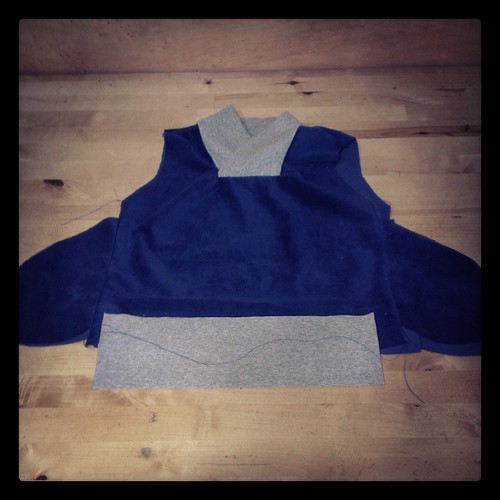
For Violet's outfit, I used the Piper dress pattern.  I seriously love this pattern.  It's an easy sew and it's very versatile.  I was too lazy to make my own bias tape so I just used plain bias tape from the store.

I had some trouble sewing the bias tape over the collar because it was bulky and it didn't lay smooth.  The problem wasn't horrible enough for me to sew it again.  Perhaps with a good pressing the bias tape will lay flatter.


I love both of these outfits, the fabric is so geeky and fun.  I foresee more like them in the future!!

Tuesday, May 20, 2014

Summer PJs - Free Sewing Patterns

I love this seahorse print!
A few weeks ago I went shopping for summer PJs for Nik and I was disappointed when I realized that the cheapest price for 3 pairs would be close to $60.  I thought that was a little much for PJs that will probably only fit this summer, so I decided to make some (not like a have a shortage of fabric in my stash).

I pulled out some knit fabric from my stash and used two Fishsticks Designs Patterns.  For the tank I used the Tank Pattern and for the shorts I used the Mud Puddle Splasher Shorts Pattern.  Both patterns are well written and easy to follow.  These patterns are great for beginners sewing with knits.

I'm really loving how these summer PJs turned out!  If you are looking for more PJ patterns, you can check out these by Fishsticks Designs.


On a side note, this tank pattern is so much easier to sew than the McCall's Pattern that I tried last year during Kid's Clothes Week Spring 2013 (here and here).      

Tuesday, February 18, 2014

Simplicity 2292 Pattern Review

Front View
This pattern has quite a few great fall/winter clothes options however I only sewed the pants for my son.  I cut them out in a size 4T and they sat on my sewing table for months, so I'm glad I finally finished them.  It drives me nuts when I look at my sewing table and I see a half finished project or a stack of fabric that I was supposed to make something with...enough of my ranting.  When I made these  pants I left out the D ring on the side, because putting that on my toddler's pants would be a disaster.  I could imagine him attempting to tie anything he can find to that little D ring, so I left it off.
Back View
The instructions are pretty straight forward except for the part about sewing the fly.  I really think pattern companies need to be more descriptive about their patterns.  I wasn't sure if I was sewing a faux fly or a real fly.  There aren't instructions for a button or a zipper and I didn't really feel like leaving a gaping part in the fly area so I just sewed the fly shut and made it a faux fly.  I topstitched the pants with regular thread but you can't tell so I will probably go back and topstitch it with a thicker thread.  Another thing, I wish patterns gave tips on how to sew with particular fabrics.  I own a walking foot and I used it to sew the corduroy, however if I was a novice sewer and tried to sew using a regular sewing foot I would have had a difficult time.
Patch Pocket
Cargo Pocket
I think the pants came out darling and I think my son will love them once he grows into them.  I'm tempted to try sewing the jacket included in this pattern, it's pretty cute and I can make one for each of my littles.  

Tuesday, October 29, 2013

KCW Day 4 and the rest of KCW

#kidsclothesweek #sewing #distractions #varsitycowl

Last week felt like a bust!  I blame Tuesday night, because that's when my KCW started to fall apart.  I did go back after I took the picture (in my last post) to pin the sleeves on the pullover because I felt like I didn't accomplish much that night.  Also, while I cut the pockets out on Tuesday night I realized that I had cut out my main pieces the wrong way..face palm.  I thought I had brushed the velour to make sure I was cutting in the right direction but I guess I must have not been paying too much attention because the direction of the velour is left to right instead of up and down (which also means the stretch of the garment is in the wrong direction!).  I suppose it doesn't matter too much...Nik will still be able to wear it and you can't notice the mistake, it just bothers me that I was careless.

It really felt good to finally use this velour and get it out of my stash!  I really need to start sewing up more things to get this stash to a reasonable amount...it's ridiculous.  In fact I think I may have scared my coworker when I was showing off my sewing space.  Her eyes kinda bulged out a little when she saw my bookcase filled to the brim with fabric.  

I sure do love to digress, don't I?  Anyway, on Day 4 nothing happened.  I managed to cut out the fabric for the Every Little Things dress on Saturday night and that was as far as I got for KCW.  I hope to get the dress done in the next two weeks.  Perhaps since KCW is over, I can finish up a little selfish sewing that I had started.  I'm really not sure what to sew next and that is because I am lazy, like lazy with a capital "L".  I dislike changing the thread in my machines so I will work my way through my sewing queue and work on projects that require me to use the same color thread.  Who knows, maybe I'm not alone...maybe there are others who do the same thing!

#sewing #violet #distractions #finallyabletowearit #seekatesew

Over the weekend it was cold enough to finally dress the baby in the fur vest that I made during the Spring KCW.  Doesn't she look cute?  I couldn't get enough of it!


Wednesday, October 23, 2013

KCW Day 3

#kcw #varsitycowl #day2 #sewing  #distractions


I forgot how much I dislike velour....sigh...it sheds and it is also not very easy to sew with because it constantly moves.  I had purchased this fabric to make Nik a velour tracksuit last winter but I never got around to sewing it because I was hit with a bad first trimester.

For KCW I thought it'd be a great time to finally make the tracksuit, however, the more I thought about the project, the more nervous I got about working with velour again.  So after a lot of thinking I decided to reconsider my original idea and make another Varsity Cowl Pullover instead of a tracksuit.  I know Nik loves the feel of velour and he loves pockets so I added side seam pockets to this velour version.  

As you can see I didn't get too much sewing done...hopefully tonight I can finish this pullover and get started cutting out the fabric for the dress.

p.s. - Promise me that you won't ever let me sew with velour again! 

Tuesday, October 22, 2013

KCWC Day 2

#kcw #day1 #varsitycowl #nik #sewing #distractions


KCW day 1 was a great success!  I managed to cut out the fabric for the Varsity Cowl and I also taped and cut two of the patterns.  Tonight I plan to start sewing the Varsity Cowl Pullover and I am hoping to finish it all in my hour of sewing time.

During day 1 I noticed that if I didn't take breaks from my sewing (like I always do), I was able to get a lot accomplished.  I think I need to get in the habit of giving myself an certain amount of sewing time and try to stay focused during that period of time.  I felt like a more efficient sewer when I am in "the zone" and it felt great to make progress on my sewing queue.   

Sunday, October 20, 2013

Project of the Moment - Super Kid!


As I child I loved playing dress up and I especially loved capes!  I knew that I wanted to make one for Nik now that he has an interest in playing dress up.

For the cape I probably could have done without a sewing pattern however the last time I tried to cut a large amount of fabric into a perfect square, I ended up with crooked parts!  So if spending $1.99 saves my sanity then so be it...it's a small price to pay.


I bought this pattern last Halloween and I planned to use when Nik was ready to start playing dress up.  Luckily for me Ann Kelle came out with her Super Kids fabric collection this year (I seriously love all her prints!!!).  It was a no brainer that I was going to use the fabric to make a super hero cape for Nik.


I made this a size larger and I changed the fastening method of the cape because I didn't want to use a string to tie the cape.  I'm extremely cautious about fasteners that cannot be easily undone.  I cut a 3" inch tall piece of fabric and folded it in half and stitched down one edge.  I cut the length generously so it wouldn't be tugging on Nik while he plays.  I sandwiched the unfinished end between the fabrics before I sewed up the cape and I used a little velcro for the fastener.  The pattern calls for top stitching the top of the neck to seal the opening left for turning, however I think the entire cape needs to be top stitched because the lining fabric separates and poofs out (as you can see in the solo cape picture).

*p.s. I don't know why the red came out so bright, I made edits to tone it down.  :(


Tuesday, October 15, 2013

Project of the Moment - Mud Puddle Splasher Shorts

Deja vu, right?  I know you are probably thinking you already saw these pants, however these aren't pants...they're shorts.  When I bought this fabric I ordered more than I needed for the pants I was making and I had just enough to make Nik a pair of shorts for next summer.  The pants that I made him over a year ago finally fit except they were too short so I added a little more fabric to the bottom and thanks to the print, you can barely tell!
#sewing #fishstickdesigns #rileyblake #distractions
Thank you Instagram for making my phone pictures look less like phone pictures.

These shorts were made from the Mud Puddle Splashers Short pattern by Fishsticks Designs You can't really see the cuffs or the faux fly on these shorts but they are there...trust me ;)

Mud Puddle Splasher Shorts with contrast pockets #sewing #distractions #nik

Nik really likes the material...in fact after I fixed the length of pants I let him have the pants and a few minutes later I heard him crying.  I went to see why he was crying and I found him sitting on the floor trying to put the pants on over the pants he was already wearing.  It makes me happy to see that he approves of my creations (I just hope it stays that way!).  

Tuesday, October 8, 2013

Project of the Moment - Tee Time!

Sorry, I just had to think of a cheesy title...I couldn't resist!

My little man has been growing like a weed and all his t-shirts and pants are too small, so I decided to use my last weeks of maternity leave to focus on making him clothes.  I managed to make him a pullover sweater, a pair of shorts and two t-shirts.  It was a satisfying being sew productive ;)

While I was looking through my stash and planning out what to use for the t-shirts I wanted to make Nik, I noticed that I have a ton of striped fabric...I jokingly told my husband that I was turning our son into a pirate and making him pirate clothing with all the striped fabric...har har!

I made these shirts using knit fabric I bought from Girl Charlee Fabrics and Fabic.com.  I did have a difficult time locating rib knit fabric in bright fun colors so if you know a place where I can get some, please let me know.

#sewing #distractions #nik

#sewing #distractions #nik

For the shirt pattern I used the free Basic Tee pattern by Made. I love the way the tutorial includes instructions on how to make shirts from scratch, like I did, or how to make toddler tees out of adult tees.  I really want to try making a toddler tee from an adult t-shirt next time...I'd love to avoid having to sew hems!

Tuesday, August 20, 2013

Toddler Muscle Tanks - M6495 Pattern Review

*This post does contain affiliate links, but all opinions are my own.*


I started making these tanks, using M6495, during Kids Clothes Week but I didn't finish them until recently.  This was my first time that I sewed with knits when I could claim that I "knew what I was doing".  I have learned a lot in the last year about knits and I'm not scared of them.  In fact they are so quick and easy to sew!

I did have a little problem attaching the neck band to the tanks and it looked a little gathered in a few areas so I went back and stitched down the seam allowance using my coverstitch machine (this could also have been done on a regular machine with a walking foot), to help smooth and flatten the neck area.  My mistake with the neck band was that I didn't stretch it enough in certain areas.  I did notice that the neck area is a little big compared to store bought muscle tanks that Nik has in the same size.

The pattern calls for folding over the fabric for the arm hole area and stitching it down.  I thought it would be easy but it was a little difficult to get 5/8" of fabric to lay nicely when I folded it over.  Besides the arm holes, the rest of the pattern was super easy and quick to sew.  Next time, I pretty sure I could crank out a muscle tee in an hour (from cut to finish).  I also might try stitching the arm hole first and then sewing the side seam after...I saw this method used in some RTW clothes (the trick is to make sure everything is even and matches up).


The knits were bought from Girl Charlee Fabrics and you can learn more about sewing with knits here.

Online Sewing Class

Tuesday, April 23, 2013

KCW Spring 2013 Day 2

#kcwspring2013 #sewing #distractions


Woo hoo!  I finished a pair of shorts!!  I did cheat a little by cutting out my fabric over the weekend, but that's not what counts, right?  ;)

This is the 4th time that I have used this pattern and I still love it!  You can check out my other creations here, here and here.  For these shorts I decided to leave off the cargo pockets and the back pockets, I thought the madras print had a lot going on already.

When I showed Nik his new shorts he grabbed my arm and lifted his leg so he could step into them...silly baby.  After I removed the shorts he was wearing so he could try on his new ones, he immediately stuck his hand inside his pocket.  Pockets are his newest discovery so he enjoys looking in my husband's pockets to see what he can find.  I still have a lot of fabric left over so I'll be making my husband a pair of matching shorts.

For day 2 I'm planning on making a little fur vest for the baby using Kate's pattern and tutorial.  I know it's not really spring/summer clothing, but I couldn't help myself!  :)


Monday, April 22, 2013

KCW Spring 2013 Day 1


I've watched others participate in Kids Clothes Week and now I'm joining in the fun!  This season KCW is from April 22nd-29th and the goal is to sew kids clothes for 1 hour each day.  My normal sewing time is around 15-30 minutes a day (my sewing room is next to the kitchen, so I can sew while I'm making dinner), so an hour is a long time for me.

When Meg from Elise Marley made the KCW week announcement I got started on making a list of things that have been sitting in my sewing queue.  Here is my list:

1. The Inside or Out Pocket Shorts by Fishstick Designs
2. Baby Geranium Dress by Rae
3. Little Fur Vest by Kate
4. McCall's M6493 or Muscle Tee by Made (I have to check the fit)
5. Newborn Rockin' Baby Gown
6. Basic Tee by Made

I got a head start on Friday by taping and cutting out half of the patterns.  On Saturday I cut the fabric for the  first three items.  If you look at my list you will notice that half of the patterns call for woven fabrics and the other half call for knits.  I am hoping to tackle the knits at the end of the week so I don't have to keep switching my serger thread!

My posts will be a little delayed because I'm posting in real time...we shall see how it goes but I might not be able to post my progress each day.  Are you participating in KCW?

Wednesday, November 7, 2012

Project of the Moment - Like Father, Like Son


The Hubby's Shorts New Look 6951
I made the hubby a pair of shorts and I thought it would be cute to make a matching pair for the baby.  I used my handy dandy Fishsticks Designs pattern and made similar little shorts for Nik.  Originally the shorts were going to be a surprise for the husband because I thought he would be thrilled to have a real life mini-me, but the surprise was ruined when he walked in on me making them...face palm.  Since the surprise was ruined I asked him if I should make them identical and add a drawstring waist with elastic and he said no, so I stayed true to the original pattern.

I cut out the shorts in a size 3T and I hemmed them per the pattern instructions.  I figured you can't go wrong on the length of shorts so now I have my first completely finished pair of shorts/pants using this pattern.

Front View
Waist Band and Pockets
Back View
My label and size label...I can't tell you how much I love the size labels.
After I photographed my husband's short, I photographed these shorts while Nik was in his baby pool.   All of a sudden Nik started screaming and reaching toward the shorts.  My husband told me, "He knows that those are for him"  So I quickly finished taking pictures and handed over the shorts so he could have them with him in his pool.  I'm sure you can imagine what he did next...yup, he got them all wet.  :)


Wednesday, October 3, 2012

Project of the Moment - Pier 49 Pants Pattern Review

Before you say anything...yes, I know these pants are a little bit...errr...out there (fabric wise)...I'd like to think of myself as more of a conservative creator but I couldn't resist the print...now on with the rest of the post.


Last summer I bought a cute pair of navy roll up pants on clearance (at Old Navy) for Nik.  I didn't really love the fabric (but the pants were so cute), it felt like a greasy kind of rayon material...do you know the type?  Anyway, I bought the pants and thought about trying to draft my own pattern (but that never happened!), then I found the Peek-a-Boo Pattern Shop and their Pier 49 Pants Pattern.
.


Perfect! 

I was a little hesitant to have the pressed open seam showing on the pants so I contacted Peek-a-Boo Patterns and asked if there was an option for adding lining and they directed me to Melly's tutorial.   I looked at Melly's tutorial but I ended up not being able to add lining because I didn't have enough red accent fabric (doh!)...oh well, maybe next time I can try lining the pants.  This time around I just serged the seams so the fabric wouldn't fray after a few washings.

The pants have a few details, mostly top/decorative stitching (which I didn't do).  I like this pattern because it can be used for boys and girls, and it comes in a variety of sizes in one pattern.

Overall the pattern was easy to follow and the only complaint I have is that the pieces are a little difficult to line up when you're taping them together...but that could just be me.  It does seem like there are a lot of little pieces and steps, but there really isn't.

I made these pants in a size 4T  (and left the waist band and hem undone for now) and I think I'm going to make a few more in different sizes. Perhaps I'll try making a back patch pocket on the next pair of pants instead of a faux back pocket flap.

I plan on using cord for the belt and inserting elastic when Nik is old enough to fit in the pants.
Front View
Side view with button
Back View
Faux Back Pocket
Front View of Rolled-Up Pants
Close Up of Rolled-Up Cuff
I'm anxious to see how Nik reacts once he can fit into the clothes I've made for him...I hope he likes my creations.  My mom never sewed for me but I didn't object to most of the clothes she got me...err...at least that's how I remember it (ok, so maybe I refused to wear things with shoulder pads in them).