Translate

Showing posts with label Whipstitch Fabrics. Show all posts

Thursday, September 13, 2012

Project of the Moment - RIT Your Heart Out

I had my little brother help out with a few of the gifts we made for his band director and I was very impressed by his quick learning.  I mean, I knew the kid was smart but I didn't expect him to pick up on crafting so fast!  For one of the projects we dyed 5 little onesies to match the color of the fabric I used for the other gifts and decorated them.  I will admit we did make his band director a lot of gifts, but it's hard to stop crafting when you're having fun.

While I cooked dinner my brother dyed the onesies and he got the color pretty darn close.  See for yourself:


When I first thought of the onesies I wanted to make felt appliques but then I stumbled upon the perfect iron-on appliques at JoAnn's.


Of course I had to make a onesie with a tie applique!  I wanted to make one for Nik so I figured now would be the perfect time to try making one.

The bib was the final project I made for my sewing for kids class.  It was very easy to make and I was able to sew it all in one sitting.  I added iron-on fleece in the middle to make it more absorbent.  I originally wanted to make the fabric waterproof but when I read the packaging it advised, as a precaution, against using it on things that may be "...chewed or sucked on by children."


After I made the bib I still had a good amount of fabric left over so I made a tie applique onesie and matching mitts, however I'm afraid the mitts might be too large for the newborn.


Tuesday, July 31, 2012

Sewing for Kids Round Up

I have sad news, I lost everything on my computer.  It really sucks when I start thinking about everything that I lost...all my pictures and documents.  I had pictures of all my projects on my computer so I could look back and keep record of the things I made but I lost those images.  At least some of my pictures are still here on the blog.

Even though you've probably seen these pictures over the last few months, I thought it'd be nice to do a re-cap so you can see all the cool things I made in my Sewing for Kids class.

Here is my first project, the double skirt.  I made skirts for little girls before but I really like the style of the double skirt with complimentary fabric.  Oh so chic!


The apron skirt variation is a cute little number but I thought the corner sewing was frustrating because my corners would line up nice and even.  In the end I got everything to line up but it took me a few tries.


Baby pants!  I was a little nervous to sew these, even though I've made pants for myself before.  I think it was the elastic back and faux fly that I found to be intimidating.  In reality these pants are super quick and easy to make and I plan to make more for Nik.


Ah, the collared shirt...yeah...I didn't quite finish it.  I don't think I'll use this pattern again.  Deborah's pattern is very cute but I think a short sleeve version would be best for Nik.  I found a McCall pattern that I'd like to try (it's a little different).  Perhaps this time I'll use "wearable muslin" so I won't have the fraying problems I did with the muslin in the picture.


Another double layer skirt, this time with bolder prints!


The pinafore is probably the cutest little thing ever, but it did have a fair amount of steps to the construction and the hem was a pain.  I guess I really need to see how the hem should be done in person.  My hem didn't look bad from the outside but I felt like it didn't look correct on the inside (but who's going to see that?).


The overmost was my favorite thing to sew!  I love the style (and the fact that it can be reversible)!  In fact, I used to own 5 pairs back in 7th grade.  Yes, at times I would wear a different pair each day.  By the time I started high school I had outgrown them all (that was probably for the best..however I did own a pair of short overalls).  My husband also loved these little overalls because they reminded him of the ones he used to wear when we were in high school.  I guess that makes us on big redneck overall wearing family!


The reversible jacket was not my favorite thing to sew because of the zipper.  I think I had to redo it 3 times...ugh!  I hope that the next time around it will be easier for me and that Nik likes this jacket when he gets a little bigger.


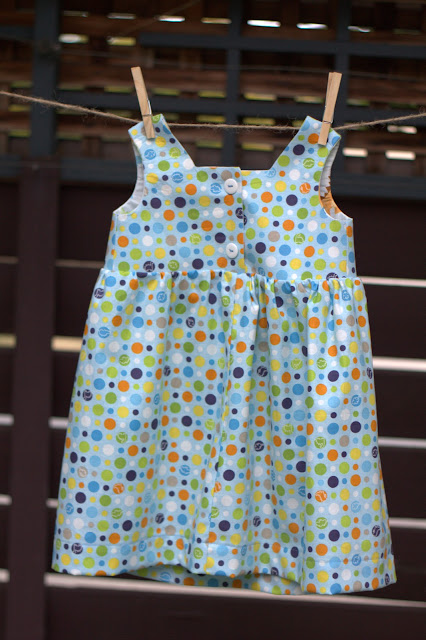
This dress was quick and easy to sew and I even used buttons!  If I ever have a little girl, she will be wearing tons of these dresses.  The pattern is simple but the re-mix possibilities are endless.


I may have said this a few times before, but I think the class was worth the money.  This class boosted my sewing confidence and I learned a lot about complex garment assembly (not to mention the patterns were included so I can use them over and over again).  I wouldn't call myself a beginner sewer, a rusty sewer would be a little more appropriate.  Deborah's class is perfect for sewers of all levels and it's tons of fun sewing along with someone else.  If you're interested in signing up for the next class, you can find more information on Whipstitch's website.     

Tuesday, July 24, 2012

Project of the Moment - Chicks Dig Dinosaurs

Fin!  Ok, even though I didn't sew all of the projects from my sewing for kids class (I don't plan on sewing the bonnet and I need to try making a shirt again), I finally feel the weight off my shoulders. This project is the last project I was worried about completing before my access to the class website expired.  

Dress Front
Dinosaurs!
Back opening with buttons!!
Dress Back
For the inside lining I put more dinosaur fabric...you can't really tell but the print isn't one direction.
I added my tag so I could write the size, I really need to get size labels.
Isn't it cute?  I must have sewn this in record time, in fact it all came together so fast that my husband was amazed.  I cut out the pieces on a Tuesday night while making dinner.  On Wednesday night I cut out the interfacing and attached it to the bodice, put the baby to sleep and finished sewing the bodice, attaching the skirt and making the button holes!  Then, on Thursday night I sewed on the buttons (by hand, I guess I didn't get a button foot with my machine, oops!) and made the hem.  Needless to say, my fear of making button holes has been conquered.  I no longer have to put a pattern back in the bin if it calls for buttonholes.

For this project I was inspired by the fabric and I thought it would be perfect for a special little lady I know who loves dinosaurs.  The colors and the pattern of this fabric collection by Little Yellow Bicycle is great for both boys and girls.  I just wish I would have had something like this when I was little...I would have loved it!  Once upon a time I loved dinosaurs sooo much that I memorized facts about each and every single one.  This was my favorite book (it may be a tad outdated now):


I was introduced to dinosaurs by my Uncle Edward and I remember him beaming with pride when he would tell the story of how his 5 year old niece informed her teacher that there is no such thing as a brontosaurus. Of course my teacher didn't believe my story of how the brontosaurus had the wrong head and it was actually an Apatosaurus.  Oh how I digress...anyway, I'm very happy with the outcome of this dress and I can't wait to see little HB wear it. 

Tuesday, July 17, 2012

Project of the Moment - Reversible Jacket


I had the most difficult time selecting fabrics that I like that were fun and cute (not plain) but also boyish.  I searched my local stores and didn't find anything I really loved so I started looking online.  I ended up buying the majority of my fabric from Hawthorne Threads, they have so many fun fabrics and they make it super easy to find what you need. 

For my son's reversible jacket I wanted the print to be colorful and fun but not a "in your face" kind of print so this is what I selected:

For the main fabric:

For the lining:


I guess you could argue that there really isn't a "main" fabric since it is reversible. I don't know where I went wrong but the jacket didn't really come together as nicely as Deborah's did in her videos. I mean...the jacket looks ok but I had to redo a few parts, I think it's because the 14" zipper I selected was a little too long.  I also didn't have fun installing the zipper, but I must say that my zipper sewing skills are improving. If I ever make the jacket again, I'm going to try using a fully reversible zipper so it's easier for Nik to put on and take off (right now he still needs help so the one sided zipper is fine).


Now that the jacket is finished I have one more "big" project (a dress) and two smaller ones (a bib and a bonnet...but I don't plan on making the bonnet), which should be easy (except that the dress calls for buttons...eeek!).

On a side note, during my break from sewing the jacket I went through Nik's clothes and put away what he out grew and put 18MO and 2T clothes in his dresser. He is definitely set in the clothes department for quite a while...in fact he probably won't need new clothes until the beginning of next year. Which means that I can start making clothes for me without feeling guilty. ;)

Thursday, June 28, 2012

Project of the Moment - Overmost

When I signed up for the Sewing for Kids class I was giving a syllabus with a list or projects and I had no idea what an overmost looked like so I googled it.  In my search result I found Deborah's pattern.  She explains that they really don't cover all, they only cover most...so true!

Front View
At first I thought these might be a lot of work but they really weren't.  They were very simple and easy to make, everything was straightforward.  I actually enjoyed making these because they are so darn cute!  The pattern is written so that they can be reversible but I decided to not make them that way since the other fabric I selected is white.  I couldn't resist the bunting pattern fabric, I just had to use it so I bought it to use for the lining.  

Outside Front Pocket
Front View and Pocket
Back View with Pocket
Buckle Strap

Elastic Back
Inside Lining
Originally I had envisioned making these out of baby blue fabric and using the bunting fabric.  I was a little afraid it might look too girly so I contacted the lovely people at Hawthorne Threads and they said they didn't think my selection was girly but that I might want to consider a darker fabric since I was making them for a toddler. 

The color I thought of using for the outer fabric:


With this as the lining:


And this is what I ended up using for the outer fabric instead:


Instead of buttons I used the Dritz Overall Buckle For 1.25 Inch Strap (2 Per Package) - Antique Brass. I opted for traditional adjustable overall buckles for two reason, one, my little guy is growing like a weed and, two, I really haven't practiced making button holes. I guess I just need to sit down one day and practice so I'm ready to add buttons to the dress I'll be making soon.

I really like the way these came out in the end, they look super professional!  I can't wait to make some more for Nik.

Friday, March 23, 2012

Project of the Moment - Back to School

My cousin's little girl had her birthday party over a month ago and I started making her a dress two days before the party.  It was last minute because I didn't know what to make/give her.  I made the bodice for the dress but the placement of the straps was bad so she couldn't try it on.  I was thankful that I had bought her two tops and I was able to give her those on her birthday so she had something to open.  I have been desperately trying to finish the party favors and decorations for my son's birthday so I put the dress on hold until this last week.   I removed the straps and guess what, the bodice was too small!  I guess it's a good thing I signed up for an e-course on how to sew children's clothing.


I found out about this e-course last week while reading luvinthemommyhood.  Immediately I clicked over to Whipstitch Fabrics to read all about the e-course.  Taking an e-course is a big commitment for me because it means I need to set time aside to "study" and practice the lessons I'm learning.  The first week we learned how to construct a twirly little girls skirt (and make a few variations of the skirt pattern), which was perfect because we got a last minute invite to Gaby's birthday party on Saturday!  I really like the structure of the classes, the instructional videos are clear and they are short enough for me to watch on my lunch break.  I also appreciate the fact that she has considered our busy schedules and the lessons should take no more time than 45mins.  

If you want more information on the e-course I'm taking or want to check out the other courses offered by Whipstitch Fabrics, you can check them out here.

I can't believe I made such a cute little skirt, this class is already paying off!  :)