Translate

Wednesday, February 29, 2012

11 Things

(This is from 2003 or 2004, when I was a UCLA CSO and had short hair.)
 
Chain blogging, yeah!!!

You may have noticed that some of the big bloggers have the same post title, however I can assure you all the posts are different.  Dana from Wonder Forest tagged all of her readers so I'm going to take her challenge.  The rules are to answer 11 questions post a picture of yourself, write your own 11 questions and tag people and let them know they are tagged, however I'm a rebel and I don't play by the rules so I'm not going to force people to answer my questions.

Here are Dana's questions and my answers:

1 - Do you ever wish on things?
Yes,  I wish on shooting stars and birthday candles.  I never tell anyone my wish because I want it to come true.  

2 - Would you shave your head for $10,000?
I would shave my head for $10,000, that could buy a lot of fabric and craft supplies!

3 -  What is one mistake you've made that you wish you could go back and try again?
I wish I had been a better soccer player, if I could I would go back and work on my skills.

4 -  Jeans or leggings?
Jeans for sure, I have a difficult time finding things to wear with leggings.

5 -  Have you ever spit on someone?
Nope, can't say that I have.

6 - What's the first thing you do when you wake up and get out of bed?
Say "Good morning" to my baby and snuggle with him before going to take my morning shower.

7 - When was your first kiss?
Age 9

8 - Have you ever done anything illegal?
Does speeding count?  My nickname is Maria Andretti.

9 - If they could breed magical animals, what kind would you have?
A unicorn!

10 - Have you ever read someone elses diary?
I don't remember ever doing so...

11 - If you could get rid of one thing in the entire world, what would you get rid of?
SIDS, I rarely slept when my son was younger because I was terrified of SIDS.

Tuesday, February 28, 2012

Softie Face Tutorial (A.K.A. How To Make A Monster Smile)


For my son's birthday party I decided to make monster softies for favors.  I searched online and found some cute patterns and I drew some of my own (which I haven't used yet) and everything seemed to be going fine until I got to the face.  When it came time for me to make the face of the monsters I realized I didn't know the proper way to create a smile, so I asked my Nana.  

Here's how you make a monster smile:

Supplies:

1.  Fabric Marker
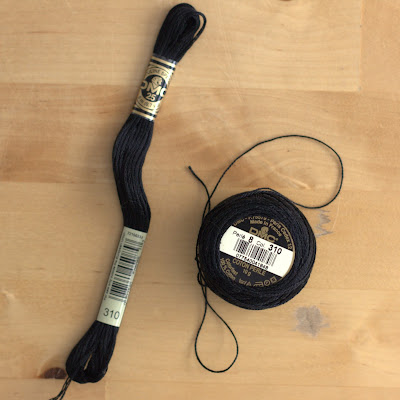
2. Two Strand Embroidery Floss (You can buy the kind on the left and separate the thread to be two strands or you can buy the kind on the right that comes with only two strands)
3. Print the monster pattern from One Charming Party
(I wrote a helpful tutorial on how to make and sew your own monster softie patterns here)
4. Hand Sewing Needle


Instructions:  (Disregard the pins in the pictures, you are making the face only on the front side of the softie.)

1.  Take your disappearing ink fabric marker and draw the line of the smile.  In my picture below you can faintly see the half of the smile not filled in yet.


2.  Using the double strand embroidery floss, knot the end and start your first stitch.  I made my stitches small (roughly 1/4") because I really wanted to make the curves of the smile.  Step 3 will show you how to continue your stitches.


3.  As you bring your needle up from underneath your fabric, you will separate the two strands of your thread and pull your thread through the opening.

See how I pulled my thread through the middle of my two strands?

4.  Continue sewing along your smile line and when you are done, knot the thread on the backside of your fabric.


On a side note, I made the eyes by cutting out my felt shapes and gluing them with felt glue.  I let the felt glue dry and I reinforced the glue with stitches.  Once I had the center of the eye secured I used embroidery thread (I liked the look of big noticeable stitches) to attach the eye to the face of the monster.

Friday, February 24, 2012

Sorry for the lack of posts, I've been very busy!

I friggin' love snow Mom!!!

This last week flew by for me and not all of it went the way I had envisioned.  Thursday night my brother had a college admissions interview at my house and Friday night our out of town friends arrived for a wedding.  Saturday the wedding lasted from noon until 1am...no joke!  Sunday I cleaned up the house and packed for our trip to Tahoe on Monday.  Monday my husband woke up with BAD allergies so the whole family laid in bed for the morning.  Once we all got out of bed and ate, we packed up the car and left for Tahoe.  Tuesday my back was killing me but we all got dressed to play in the snow that was outside.  Wednesday we woke up early so I could clean the house and pack to go home.  Along the way we stopped in Old Sacramento to visit and get some exercise.   Thursday I was back at work and in the evening I went to my brother's school concert. 

All in all over the last week I finish two monsters, decorated 6 pom pom monsters and made another 5 pom pom monsters.  I also started my cross stitch project, which is the perfect activity to do while watching the baby play.  I put down my cross stitching to make dinner and my husband picked up where I left off and made a few stitches of his own.  He threw it back down as soon as dinner was ready (I think he's a closet crafter).

I'm dying to write another tutorial, so hopefully I'll be able to write one over the weekend.    Happy Friday!!!!

Thursday, February 23, 2012

Monster Party Table Decorations

For the tables I decided to create pom pom monsters.

My awesome pom pom maker

Future pom pom monster

I got the inspiration after I saw this book:


I've made pom pom creatures before so I decided to make my own and lucky for me I found a pom pom maker!  How awesome is that?  Something to help you make pom poms!  The pom pom maker come in a variety of sizes, I bought the extra large pom pom maker so the monsters would be big enough to add some flair to the tables.  You can buy your own pom pom maker here:


This pom pom maker makes life easy when it's time to cut the yarn, also I don't have to worry about wrapping the yarn too tight and causing the cardboard to bend.  I will be looking for more projects to use it for. :)


Tuesday, February 14, 2012

The one that almost got away


I met my husband in high school.  Actually we went to the same junior high but I didn't get to know him until our sophomore year in high school.  Looking back it's hard to imagine that the same boy who shared homeroom with me and was randomly seated near me in our class pictures would become my husband.


The first time I talked to my husband was during 10th grade geometry class.  It was a forced meeting because he was assigned the seat behind me and we had to work together on class projects.  At the time I had a boyfriend and he had a girlfriend so our conversations were limited to class work.  I liked talking to him but he kept to himself most of the time.  To start conversations I would ask him to help me draw triangles using my compass.  Since he's a nice guy he would help me out with my triangles (little did he know I really did know how to draw triangles).     


After class ended we still had homeroom together once a week for 15 minutes.  Most of the time he sat near me but we didn't speak.  I silently admired him and hoped that one day I could find a guy like him. 

When senior year came around I was single (so was he) and I was planning to attend college in Southern California.  I wanted to go to Senior Prom, especially since I helped plan it, but I didn't have a date.  I'm not the sort of person that sits back and waits for things to happen, so I asked him to go to prom with me as a friend.  The first time I asked he turned me down, he said he didn't want to go to prom.

I didn't know what to do after he told me no, so I talked to my mom she told me I should tell him the truth, that I should tell him I like him.  Taking her advice I invited him out to dinner and calmly told him, "Look, I like you and this may be my last chance to go out with you before I go to UCLA."  He grinned (from ear to ear) and agreed to go to prom with me.  I wasn't hoping for anything to develop because I thought it wouldn't be fair to have a long distance relationship.      

We started spending time together planning for prom and during one of those evenings (two days before prom) he kissed me.  After he kissed me I said, "Well, we have two options.  We can still go to prom as friends or I am going to LA..."  To which he replied, "I chose the second one."  I smiled and kissed him again, I didn't expect him to say yes to a long distance relationship.


We stayed and talked for a while after that and before I knew it, it was midnight!  I didn't have a curfew but I did have an important test the next morning so I rushed home using the main streets.  On my way home I got my first ticket, I wish I could say it was my last!  Oh well, c'est la vie, at least he's the last man I'll ever have to ask to dance.


Engagement and Wedding Photography by: Lukas VanDyke


Thursday, February 9, 2012

My Handmade Valentine's Day (For the Boy)

On one of my shopping trips to Target I found a toddler plate set with owls!  Hopefully the baby will soon start to use plates and spoons instead of throw them.

Since I made mustache the unofficial theme for V-Day at our house, I made the baby a mustache applique thermal tee.  Now baby and daddy have similar gifts! 


To make your own, you can follow my instructions listed in my coffee cozy tutorial here.

Monday, February 6, 2012

Wonder Land

When I was a little girl my grandma showed me how to crochet.  Let me correct myself, she showed me how to make a crochet chain.  I was good at making a chain!  I didn't use the right techniques but it didn't matter, I was 7 and I thought I could crochet!

When I was pregnant I wanted to learn how to crochet "for real" and make things for my baby.  I tried to make a bear beanie for the baby to match bear booties I had bought him from FiveSisterz.  I started the hat and my husband and brother-in-law told me that it didn't look right and that I was probably reading the pattern wrong so I stopped making the hat and I was going to attend a crochet class (which never happened).  I'm sure you're wondering why I listened to two guys...I dunno myself...they sounded convincing and they learned a little crochet when they were in school in Germany.  Actually my husband is better at making crochet chains than I am, go figure!  Ok, so on to the story...

I'm trying to crochet again and I want to make this:


How awesome is he? I pinned a few other things that I would like to be able to make such as this:


And these:

Source: etsy.com via Ashley on Pinterest


I also bought this book for knitting over the weekend:


The designs in this book are modern and darling! I really want to master crochet and kitting this year!

Saturday, February 4, 2012

Coffee Cup Cozy Tutorial

Sorry for the delay on this post, I wanted to finish this before the weekend but this thing called lack of sleep got in the way of me finishing this post.
I definitely didn't come up with this idea, it's been going around the internet for a while.  I'm just gonna show you how I made mine and I'm also going to share my cozy template with you.  
If you know how to knit you can follow this tutorial from luvinthemommyhood and make a knitted version.
Supplies:
1. Felt Rectangle 
2. Black or brown felt for the mustache
3. Embroidery or sewing thread to match the mustache
4. Scissors 
5. Invisible Fabric Marker

Instructions:

1. Use the coffee cozy template provided here and trace it out on your felt using your invisible fabric marker.


2.  Now it's time to cut it out.  I forgot to take a picture of me cutting out the mustache.  Don't forget to cut that out!  You can find a mustache template here in this post: luvinthemommyhood


3.  Using a pin wrap the cozy up and mark where the two end should meet.


4.  Place your mustache on your cozy and pin it down.


5.  Begin sewing along the edge of your felt mustache.

Keep your knot behind your mustache as you begin to sew.


It's hard to see the stitches in the picture.

Tie it off with a knot.

6.  With the back of your cozy still in place, stitch the back.  You can use any type of stitch, I used a whip stitch.  You can find a good visual reference of stitches here.


Sorry for the poor lighting.

Friday, February 3, 2012

What I'm coveting...

I just realized that Tom's now has ballet flats!  I loved their wedges from last spring/summer (but I didn't buy any) and now I really want these ballet flats.  Aren't they cute? 

p.s. I'm working on getting a new tutorial up. I just haven't had much free time to finish the post, my son hasn't wanted to go to sleep until midnight or later this last week. Needless to say I'm not a pretty sight right now.

Thursday, February 2, 2012

Get out of my head!

That title makes me sound crazy but I'm not...or at least I don't think I am because crazy people don't know they're crazy, right?  Or do they?  Anyway, I have this song stuck in my head and right now I have it on repeat.


Wednesday, February 1, 2012

I'm Guest Posting Today

Today I'm guest posting over at Clothed Much and showing you how to make your own elbow patches with supplies you have at home (ok, maybe not everyone has felt laying around like me...but you should have all the other things just laying around).  I hope to see you over there!