I survived Nik's first birthday party!!! Who would have thought that my prom committee (and student government) experience would prepare me to plan my son's birthday party? Not me!
I know I'm late with this post but things have been a little hectic. The birthday party went well, we had 60 people who said they would come (I didn't think everyone would say yes to the invitation) and 12 didn't show and another 10 left early because they had other engagements so we ended up with around 30 - 40 people (including children) which was perfect. I was seriously stressing about the menu two weeks before the party when I realized how many people might be at the party. I ended up keeping it simple and making it a BBQ with hamburgers, hot dogs, chicken, salad, potato salad and baked beans. For the appetizers I bought strawberries, veggie straws and veggie platters. I got everything from Costco which helped us save a bundle!
My husband made fresh O.J. from the oranges in our back yard and we bought bottled water and a few bottles of soda for the drinks. For the dessert I made sugar cookies, cupcakes and the birthday cake (and I also make the icing).
We had children of all ages at the birthday party so I thought of a few activities to keep them entertained. Initially I thought of making a coloring station but then I remembered kids like to draw on walls and things they shouldn't, so I bought chalk instead and let them go to town. While cruising the aisles of my local Target I found a bubble machine for $7.50 so I immediately snatched it up (the kids went nuts over the bubbles and I didn't have to deal with spilled bubble solution). For the little babies I bought a variety toy set from Big Lots for $7 (so they could chew, lose and destroy the toys without us caring) and I used an outdoor blanket to set up a tummy time area.
A few things I did learn for next time:
1. Put someone in charge of taking pictures because you'll be too busy running around to take any pictures.
2. Put up signs so people know where the drinks are and other things they might need, like the trash can.
3. Have everything ready to go out an hour before the party is supposed to start so if you have guests that arrive early or on time they can help you set out the stuff on the tables.
4. Have the table(s) and chairs set up as early as possible, even the night before if you can (so I'm not running around in my PJ's minutes before guest arrive trying to set up all the chairs).
5. Put on your make-up and style your hair before you change into your clothes and wait to change into your clothes until the party is about to start (because you might have to run around cleaning tables and setting up chairs). I was able to put on my make-up but I never got the chance to fix my hair because I thought I would have time before the party...pfft!
Here's a round-up of all the birthday crafts:
I know I'm late with this post but things have been a little hectic. The birthday party went well, we had 60 people who said they would come (I didn't think everyone would say yes to the invitation) and 12 didn't show and another 10 left early because they had other engagements so we ended up with around 30 - 40 people (including children) which was perfect. I was seriously stressing about the menu two weeks before the party when I realized how many people might be at the party. I ended up keeping it simple and making it a BBQ with hamburgers, hot dogs, chicken, salad, potato salad and baked beans. For the appetizers I bought strawberries, veggie straws and veggie platters. I got everything from Costco which helped us save a bundle!
My husband made fresh O.J. from the oranges in our back yard and we bought bottled water and a few bottles of soda for the drinks. For the dessert I made sugar cookies, cupcakes and the birthday cake (and I also make the icing).
We had children of all ages at the birthday party so I thought of a few activities to keep them entertained. Initially I thought of making a coloring station but then I remembered kids like to draw on walls and things they shouldn't, so I bought chalk instead and let them go to town. While cruising the aisles of my local Target I found a bubble machine for $7.50 so I immediately snatched it up (the kids went nuts over the bubbles and I didn't have to deal with spilled bubble solution). For the little babies I bought a variety toy set from Big Lots for $7 (so they could chew, lose and destroy the toys without us caring) and I used an outdoor blanket to set up a tummy time area.
 |
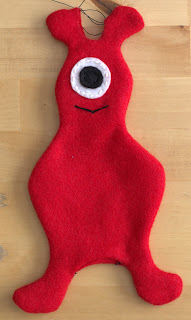
| Monster Softie Favors, Freshly Squeezed O.J., Monster Pops and Cards for Nik's Time Capsule |
 |
| The 11ft Birthday Bunting I made for Nik |
 |
| Monster Cupcakes, The Birthday Cake, Pom-Pom Monsters and Handmade Party Hats |
 |
| I tried to point and tell him to blow out the candle but Nik didn't know what to do. |
1. Put someone in charge of taking pictures because you'll be too busy running around to take any pictures.
2. Put up signs so people know where the drinks are and other things they might need, like the trash can.
3. Have everything ready to go out an hour before the party is supposed to start so if you have guests that arrive early or on time they can help you set out the stuff on the tables.
4. Have the table(s) and chairs set up as early as possible, even the night before if you can (so I'm not running around in my PJ's minutes before guest arrive trying to set up all the chairs).
5. Put on your make-up and style your hair before you change into your clothes and wait to change into your clothes until the party is about to start (because you might have to run around cleaning tables and setting up chairs). I was able to put on my make-up but I never got the chance to fix my hair because I thought I would have time before the party...pfft!
Here's a round-up of all the birthday crafts:
- Pom-Pom Monsters: Here and Here
- Monster Softies: Here and Here
- Party Hats: Tutorials Found Here and Here
- Sugar Cookie Recipe: Found Here
- Buttercream Frosting: Here
- Monster Can and Monster Pops: Here
- Bunting (soon to be available in my Etsy store): Read More Here


