Translate

Friday, April 27, 2012

Last weekend's high and low

By the looks of this post title you'd think I was going to give you the weekend weather forecast, but I'm not!  Instead, I'm showing you what I wore during our summer like weekend we just had here in the Bay Area.

I really love the high-low hem style and when a new Francesca's store opened up near me (of course I had to check it out) I found this cute skirt (in my favorite color!) as well as the dress I wore in our family pictures.  If I have time I might just make a skirt using this skirt as my pattern, of course I should probably finish the winter skirt I started making for myself a few months ago.

My outfit was pretty basic, just a plain tee and my pretty skirt and the sandals I had to buy one day while shopping because my heels were creating blisters.  I think for vertically challenged people like me you really need to wear heels (which is why I own a million pairs of heels), but most days I wear flat shoes.


Top: Target, Skirt: Francesca's (similar), Shoes: Nine West via Ross (similar)


Last budget update (April):
Spent: $366.75
Remaining: $433.25

Wednesday, April 25, 2012

Project of the Moment


Wow, so it took me a while to get this skirt done...I just didn't have time to sew.  As you remember, I never made a dress for my cousin's daughter (whose birthday was back in February) because it came out too small.  Instead of a dress I decided to make her one of the skirts I learned how to make in my sewing for kids class (you can read more about it here).  With this little skirt completed I'm finally starting to make the pants I was supposed to in week 2 of the class, although with summer around the corner I may shorten them.

Also, to match the skirt I made fabric rose hair accessories.  I think the gingham makes this skirt look very vintage.  


P.S. - I finished the baby shower gifts for baby Zach, yeah!  I made a flannel blanket with a decorative stitch along the edge, a satin trimmed fleece blanket and a bunting for the nursery.  I can't wait to meet the little man.  :)


Friday, April 20, 2012

Picnic Time...Well, Sorta

I bought a picnic basket a couple of months ago because I wanted one for the spring and summer (and I thought it would look cute in our family pictures), but then out of the blue my husband asked if we could go for a Sunday drive.  We've been so busy that a nice weekend away from everyone and the house sounded amazing.

The hubby said we would need to pack a lunch because there wasn't a lot of places to eat where we were going, so we got up the next morning and I busted out the picnic basket.  He made the sandwiches and I got the baby ready and packed some snacks to go with our sandwiches.  I also packed up our new outdoor blanket that we got (JJ Cole Collections All-Purpose Blanket, Gray/Red).

At first we didn't find anywhere to stop and eat so we had a trunk picnic, which wasn't as bad as it sounds.  We just opened up the basket and ate standing up beside the car.  Miraculously it was the first time in a while that the baby didn't put up a fight over eating (needless to say we were very happy).

And as you may remember I recently professed my love for stripes, well I wasn't kidding when I said it.  I found this cute striped dress the night I found the dress I wore to Nik's birthday party.  It's so classy and simple that I couldn't resist it plus it is super soft and comfy. 


Dress: French Connection via Marshalls (similar), Shoes: Ann Taylor Loft (similar)

I'm pretty sure my budget isn't going to last very long...however, on the up side it does make me conscious of how much I'm spending and I've become a little bit more frugal with my clothing purchases.


Last budget update (March):

Spent: $311.25

Remaining: $488.75

Thursday, April 19, 2012

Our Family Pictures

We took some family pictures with Marc from On The Marc Photo this past weekend and there was only a few that I liked that had me in them...most of them had my bangs in my eyes or I was making a funny face (I could kick myself!).

I made a bunting that said "family" but the wind ruined most of the pictures we took with the banner.  In some of the pictures you can see the bunting laying on the picnic blanket.

The picnic basket came from Bed Bath & Beyond and I found the picnic blanket at Turkish Towel on Etsy.  I was thrilled when I got the blanket because it was exactly what I was looking for and it was an amazing price!

Here's the best of the bunch (you may notice I didn't get around to doing my hair...I know, I fail):


Tuesday, April 17, 2012

Nik's Monster 1st Birthday Party and Craft Round-Up

I survived Nik's first birthday party!!!  Who would have thought that my prom committee (and student government) experience would prepare me to plan my son's birthday party?  Not me!   

I know I'm late with this post but things have been a little hectic.  The birthday party went well, we had 60 people who said they would come (I didn't think everyone would say yes to the invitation) and 12 didn't show and another 10 left early because they had other engagements so we ended up with around 30 - 40 people (including children) which was perfect.  I was seriously stressing about the menu two weeks before the party when I realized how many people might be at the party.  I ended up keeping it simple and making it a BBQ with hamburgers, hot dogs, chicken, salad, potato salad and baked beans.  For the appetizers I bought strawberries, veggie straws and veggie platters.  I got everything from Costco which helped us save a bundle!

My husband made fresh O.J. from the oranges in our back yard and we bought bottled water and a few bottles of soda for the drinks.  For the dessert I made sugar cookies, cupcakes and the birthday cake (and I also make the icing).

We had children of all ages at the birthday party so I thought of a few activities to keep them entertained.  Initially I thought of making a coloring station but then I remembered kids like to draw on walls and things they shouldn't, so I bought chalk instead and let them go to town.  While cruising the aisles of my local Target I found a bubble machine for $7.50 so I immediately snatched it up (the kids went nuts over the bubbles and I didn't have to deal with spilled bubble solution).  For the little babies I bought a variety toy set from Big Lots for $7 (so they could chew, lose and destroy the toys without us caring) and I used an outdoor blanket to set up a tummy time area.   

Monster Softie Favors, Freshly Squeezed O.J., Monster Pops and Cards for Nik's Time Capsule
The 11ft Birthday Bunting I made for Nik
Monster Cupcakes, The Birthday Cake, Pom-Pom Monsters and Handmade Party Hats
I tried to point and tell him to blow out the candle but Nik didn't know what to do.
A few things I did learn for next time:

1. Put someone in charge of taking pictures because you'll be too busy running around to take any pictures.

2. Put up signs so people know where the drinks are and other things they might need, like the trash can.

3. Have everything ready to go out an hour before the party is supposed to start so if you have guests that arrive early or on time they can help you set out the stuff on the tables.

4. Have the table(s) and chairs set up as early as possible, even the night before if you can (so I'm not running around in my PJ's minutes before guest arrive trying to set up all the chairs).

5. Put on your make-up and style your hair before you change into your clothes and wait to change into your clothes until the party is about to start (because you might have to run around cleaning tables and setting up chairs).  I was able to put on my make-up but I never got the chance to fix my hair because I thought I would have time before the party...pfft!

Here's a round-up of all the birthday crafts:
  • Pom-Pom Monsters: Here and Here
  •  Monster Softies: Here and Here 
  • Party Hats: Tutorials Found Here and Here
  • Sugar Cookie Recipe: Found Here
  • Buttercream Frosting: Here
  • Monster Can and Monster Pops: Here
  • Bunting (soon to be available in my Etsy store): Read More Here


Friday, April 13, 2012

Quick and Easy Hairstyle Ideas

I'm anxious for this weekend because it's going to be busy (Saturday we have family pictures and a baby shower and on Sunday we're going to a friend's birthday party), and I just want to get it over and done with! 

I've been thinking a lot about our upcoming family pictures because they will be the first pictures we have taken together (meaning both parents in the shot with baby) and I want them to be cute.  I mean, who doesn't want to have cute family pictures?

In order to achieve cuteness I need to figure out what I'm going to do with my hair so I don't look like a hot mess.  In high school I styled my hair with ease daily and then I got lazy in college and I stopped.  I just kinda forgot how I used to style my hair and now I am looking for style inspiration for our family pictures.  Last Friday I attempted to play with my hair and work out some styles but it was hard to do when I was also trying to keep my son from creating mayhem.

Since my attempt to practice failed, I decided to search for a few quick and easy hairstyle ideas.  Here is what I found:


I just realized a lot of these have braids...

Thursday, April 12, 2012

Nik's Birthday Bunting and New Store Item


For the birthday party I made a bunting and painted "Happy Birthday!" on it using fabric paint. My original idea was to cut out small monsters and glue them to the bunting flags and paint on them, however in order to make that work the letters would need to be very small. I figured it would be best just to make a birthday bunting without monsters instead of trying to make my original idea with tiny unreadable letters.


Making the bunting was fun and after I finished Nik's birthday bunting I started making a few more for gifts and for our house when I thought to myself, "This is so much fun!  I really enjoy making these." 

So, if you're interested in a custom bunting please contact me at happilybyash (at) gmail (dot ) com.  Bunting prices will start at $15 (depending on the fabric and size) and I will also be creating a listing for my Etsy store sometime in the future, most likely once I finish the ones I'm currently making...I'll be sure to announce when the listing is up.


Tuesday, April 10, 2012

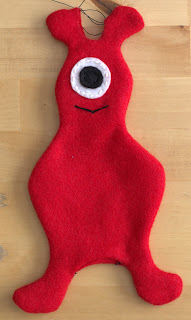
Monster Softie Tutorial

In my other tutorial I showed you how to make the face of a softie monster but I didn't show you how I made the softies.  You can use the patterns I did for my monsters or you can draw your own.  If you're going to draw your own pattern, don't worry about the little details.  Sketch out the outline and figure out the details once you have cut out the body of the monster.  If you want to use the same monster pattern I am using, you can find it here.  I apologize for not taking pictures every step of the way, I didn't think about writing this post until after the fact. 


If you are a computer wizard like my husband, you can turn your sketches into images using Adobe Illustrator.  I don't have computer skills so I had to ask my husband to turn my drawing into a pattern (but I ended up not using the pattern I made...I know, shame on me).

This project can be sew without a sewing machine but that would require a lot of stitches so I HIGHLY recommend using your machine to sew up your monster.

Let's get started with the tutorial!

Supplies:

1. Your monster pattern
2. Fabric marker
3. Scissors
4. Sewing machine
5. Hand sewing needle
6. Matching thread
7. Stuffing (*note: a 12oz bag will stuff about a dozen monsters if not more)
8. Fabric for your body and for the features  - I made mine out of felt and used embroidery floss for the features

Instructions:

1. Trace out your monster on your material with your fabric marker.  I glued my pattern to sturdy builder's paper, from Home Depot, that we had laying around.  I used felt for my project but you can use almost any type of fabric for this project.


2. Pin together your fabric around the outline of the monster so your fabric does not shift when you cut out your monster.

3. Next, create the features of the monster. Cut and attach them to the front side of the monster.  When I attached the facial features I went overboard and glued them on, let them dry and then sewed them on by hand once they were dry.  When I glued my felt features I tried to avoid putting the glue close to the edge because once it dries it is hard and difficult to sew through.  I used felt glue for my project but you can also find fabric glue if you chose not to use felt for your monster softie.  To add an embroidered smiling mouth you can view my previous tutorial here.

4. Determine the best place to leave the opening (for turning your monster right side out).  Starting from the end of the opening, sew around the edge of your monster and stopping at the other end of the opening.  Sew slowly especially if your monster has a lot of curves.  After your sewn around the perimeter (minus the opening area) inspect the reverse side and sew over any areas that may not have been sewn properly the first time.  I had to do this in the curved areas because the felt would get caught in the feeder feet.


5. Turn your monster right side out.  With my red monster I had to leave two openings, one for reversing and stuffing and the other because it was difficult to sew and turn the antennas.  I hand sewed the inside part of the antennas and stuffed the red monster through the bottom opening.  With the other monsters I only needed to leave one opening on the bottom for turning and stuffing. 

6.  Try not to over stuff your monster (you don't want the seams to explode during playtime).  If your bag of filling does not include a stick for stuffing, you can use a spare chop stick to push the stuffing gently into the small parts of the monster.  Once your monster has been stuffed, sew up the opening using a blanket stitch (if you need more pictures on how to do a blanket stitch, you can find a great tutorial here) and clip the end of the thread as close to your knot as possible.  


Yeah you have a finished monster!!!  Aren't they cute?  I made 18 (for favors) and they all found good homes after my son's birthday party.